Adobe Lightroom Classic Flags, Ratings, And Labels Section
About Lightroom Flags, Ratings, And Labels Section Overview.
Product: Adobe Lightroom Classic | Subject: Adobe Photoshop Lightroom Classic
In this exercise, we will learn about Adobe Lightroom Classic Flags, Ratings, And Labels Section Overview.
This section is an overview section where we will talk about attributes you can give to photos you manage using Adobe Photoshop Lightroom. Now, when you take photos, they have a lot of metadata that go with them. They have GPS coordinates, and they have the exposure settings, have the lens settings, whether or not the flash fire, and a whole bunch of other metadata that goes with the photo.
Now that metadata is just as important, but sometimes you may want to give a few more attributes that help you with your organization of the photos, and that's where these attributes of flags and stars and labels come into play. Now, I pointed out three different sections in this compact view. We talked about views in an earlier section. But for now, let me point them out to you again. Flags are at the top left corner, ratings are down the photo, and color labels are at the bottom right corner.

These are certain kinds of attributes that you can use with Adobe Photoshop Lightroom to help you manage your photos in a way that makes sense to you. Do you notice this library filter up here?

I'll talk about how you can use this in a later section. But for now, in the library filter, you can manage your 10s of 1000s of photos by searching for text, attributes, metadata or by searching for none at all. And we're primarily going to concern ourselves with the attributes in this section. Those attributes are flags, ratings, and colors.

This is another way to ensure that you can more easily manage your entire image library using Adobe Photoshop Lightroom. You can speed up your workflow so that you can get back to what you love doing with photography.
These attributes, one of the secrets that I'm going to share with you, make use of these attributes consistently that make sense for you. You see, I don't use the color labels. But I use flags a lot. Sometimes I use ratings because they mean something to me. And that's why I want to invite you. When you're considering using these attributes of flags, ratings, and colors, use them in such a way that makes sense to you.
In fact, you may not actually have to make use of all of them. I don't; I mainly use the flags. But sometimes, you might want to set ratings or set labels that will allow you to manage your photos in a way that makes sense to you and makes it easier for you to retrieve that kind of information that you want or that your client wants, or perhaps even your family that wants it. I hope this section has helped give you an idea of what we will be covering in the next set of sections.
Using Flags, Ratings, Colour Labels
In this section, we're going to talk about flags, ratings, and labels. You may or may not work with these three attributes, depending on how it goes with your workflow. But before I show you what these are, I want to show you the kinds of keyboard shortcuts available to you. So if you remember, Ctrl + slash will show you what is available in terms of the shortcuts. So we're going to concern ourselves with the rating shortcuts here, as well as the flagging shortcuts.

The rating shortcuts are for the star ratings and the color labels, and the flagging shortcuts for whether an image is flagged or rejected. Then, of course, you can also remove all the flags. So essentially, we're going to concern ourselves with the ratings as well as the flagging shortcuts. So essentially, you just need to memorize the rating shortcuts and flagging shortcuts that we're going to work with.
Now let's talk about the flags. This is the attribute that I use the most. So if you're in the library view, you can click on the flag itself to turn it on and off, so you can toggle it. But if you right click on it, you can see that there are three different flag statuses. The first one is flagged, the second one is unflagged, and the third one is rejected.

Now let's go ahead and select flagged. You can select it by hovering over it and clicking on the flag that is here on the icon. Now let's go ahead and right click on the next photo and set it as rejected. And now, what you'll see is that the image itself has dimmed.

So this is a kind of rejected for that we don't want to work with. And so it's kind of nice to know, right off the bat, which photos that you're working with and which ones you're rejecting. So let's go ahead and reset the status. And we just want to set it as unflagged. One way to remove the status is either right-clicking on it and set it to unflagged or just clicking on the photo and the flag icon here to remove its status. And there you go. None of these photos have any flags on them. But you can very easily once again right click on it to set it as flagged or rejected. Or you can just click on it here. Now the keyboard shortcuts for this are much easier. If you use the keyboard shortcut P, it'll set the flag as flagged, and you can see that the icon turns a little white. And that's the same thing as setting it to flag. If we want to unflag it, we click the on U key, and the U key will unflag it. You can see that the attribute is gone. Now, what if we want to reject this photo?
Well, the best way to do that with the keyboard shortcut is to push X. X will set it to the rejected flag status. And of course, you can clear it by clicking on U to set the flag status to unflagged. I use these attributes of flags to work with large amounts of photos. And that's what I like to use. It's been helpful for me and part of my workflow. In this particular view in the grid, I've put all of these attributes as part of the image. So the flag is up here. And the ratings are down here, and the color label is here. You can, of course, choose not to show it, but I think it kind of help.
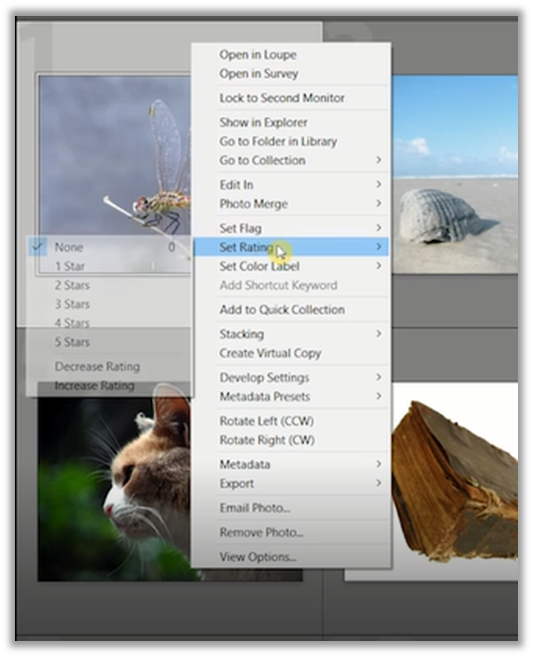
Now the other attribute that you can set is what we call the rating attribute. The rating attribute goes from zero stars to five stars, zero being having no rating. And then one, of course, is the one-star 2,3,4 and 5. Now, what if you wanted to do this quickly? Well, that's where you use the keyboard shortcuts, 1,2,3,4, or 5, and it'll adjust the readings appropriately. Now, you can unclick and make it a zero-rating. But what you can do is you can right click on the photo, you can set the rating here, and set it to none.

You can see the keyboard shortcut is a zero or a none rating. And that'll remove all the ratings. You can go ahead and select any photos and set the ratings appropriately for yourself. Now, I don't work with star ratings. But you might want to. You might want to have three stars, four stars, or five stars so that you can work with the images in your database in your catalog and sort them and work with them according to the way you work them.
The third attribute you can use with an image outside of the flag status, the rating status, is the label attribute. This label will be shown on each of these images here, at least in this view, with this small little. In the corner here, on the bottom right of the photo. If you click on it using your left mouse button, you can see five different color labels.

However, the keyboard shortcuts are only associated with 6,7,8 and 9. Now purple will be a color label that will not be available to you using a keyboard shortcut. So the only way to get to the purple label is to use your mouse and select the purple label. This purple label, because this photo is highlighted, will show in an outline of the image, but if you click elsewhere, the purple image will show in the entirety of that small compact view.

You can adjust this view using the view options, but that was covered in another video. But for now, let me remove the rating here and select None. Of course, all of these things can be done with the mouse key. All you have to do is right click on the image somewhere here. Then you can set the flag, you can set the rating, and of course, you can set the color label.
These three things here are the attributes that you're going to be mainly working with. Now attributes are great because you can use them and organize them in any way that you want. But once again, I invite you to be consistent about how you use them. So, for example, you know, all purple labeled photos are portraits or black and white photos. If you use labeling and the labels' attributes consistently, you will have an easier time working within all of your catalogs that you manage with Adobe Photoshop Lightroom.
I hope this s section of flags, ratings, and labels has been helpful. Once again, I invite you to reach out for any support regarding your continued learning in Adobe Photoshop Lightroom. I will be there as a source of support for you and your learning.
Full Course and Free Book
-

Adobe Photoshop Lightroom Classic
Course5.0 average rating (1 review)Are you a professional an amateur or an aspiring photographer or a digital artist? Impress by creating breathtaking photos with Photoshop Lightroom Classic CC. Learn hands-on techniques from one of the best photo editors there is.
Purchase$1 / month
-

Adobe Photoshop Lightroom Classic Book
CourseAre you a professional an amateur or an aspiring photographer or a digital artist? Impress by creating breathtaking photos with Photoshop Lightroom Classic CC. Learn hands-on techniques from one of the best photo editors there is.
Free