Adobe Lightroom Classic Creating And Improving Black & White (B&W) Images
About Lightroom Creating And Improving Black & White (B&W) Images
Product: Adobe Lightroom Classic | Subject: Adobe Photoshop Lightroom Classic
In this exercise, we will learn about Adobe Lightroom Classic and Creating And Improving Black & White (B&W) Images
In this section, I want to share how you can use Adobe Photoshop Lightroom and create black and white images that impact the final image. You can create black and white images in a couple of ways:
- You can open up the presets panel on the left-hand side. If you open it up, you will notice that Lightroom comes with a few default presets.

If you go ahead and open up some of them and hover over each of the presets, you will notice that each of the presets affects the final image. As you scroll down the filter presets, you'll notice how the navigator view updates itself with the final result of applying each of these presets.

- Another way to change your image into black and white is to go to the basic section on the right-hand side and choose the black and white treatment option.
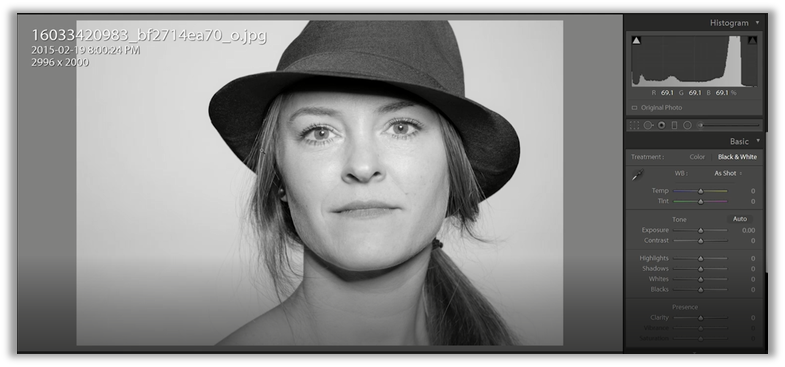
If you scroll down on the left-hand side to the History panel, you will find that it's converted to black and white with a Yes, so that means we've applied this black and white treatment.

Once the image is in a black and white format, you will notice a few options that no longer are available to us because it's in black and white. For example, the presence, we only have the clarity adjustment. We no longer have access to vibrance or saturation because this is a black and white image.

Now, converting an image to black and white is alright; in fact, you can get a very nice black and white image. But what if you want your black and white image to look like this,

This black and white image has strong clarity. It's got strong darks and strong highlights. So this image, actually, to me, has a lot of impacts. How do we make the image that we have converted look like the image above? That's very easy with Adobe Photoshop Lightroom. So I'm just going to go back to our image. Then I will work with the sliders. I'm just going to increase the clarity, adjust the highlights, deepen the blacks. I will also lighten up a few things and then also adjust for the exposure. And that's well and good.

But one other thing that I can do is going to HSL/Color/Black and White tonal adjustments. You will notice that I can adjust all of these channels. However, I want to make even more fine-tuned adjustments.

I can make adjustments to the red channel, the orange channel, or each of these channels individually by adjusting the sliders, and they'll have a different kind of impact on the photo. I want to point out that red, orange and yellow are closely linked with skin tones. But be careful that you don't adjust one. Just make sure that you adjust each of them in proportion to each other.
What if we don't know which of the channels we want to adjust? There's a little button out here that lets you adjust the black and white mix by clicking and dragging on the photo.

So, I'm just going to click and drag it over the photo, and you'll notice that the cursor changes to a crosshair with a little icon below it. Now that I have this new cursor, I want to go to certain parts of the image. For example, I'm going to click on it and drag it up or down, and you'll notice the slider changes appropriately. In this case, it makes very dramatic effects.

As I hover over the image, you will notice that on the right-hand side, certain channels are going to be adjusted. If you recall, the background was blue. So, anywhere on the background is the blue channel. So we're just going to go ahead and dim that because we want our individuals here to stand out. If I dim too much, it doesn't become that great. So I want to make sure that all of the background sorts of eases and blends into this and have additional impact. I'm going to adjust all the colors to make sure that she's a little bit vibrant, and he can stand out in this image. Now that I've made these adjustments let's go to the before and after view. I'm just going to click on the backslash key. This is what the image was like before.

And this is the image after.

So, let's just escape out of this and get to the toolbar. What I want to do now is I want to use the Compare view before and after in the left-hand and right hand, respectively.

Now each of these images has its kind of impact. Blocking White has a certain kind of look, a certain kind of impact that we want. And the color view has a certain kind of look and a certain kind of impact that we want. Whichever one you want to work with is entirely up to you. Depending on your artistic preference or your client's preference, you might want to pick one over the other.
Very quickly, to recap, you can create black and white images by going to one of the presets that Lightroom has enabled by default and choose the appropriate preset. Or we can go to the basic panel and choose the black and white treatment. Now any tweaks that we make to the black and white, we will have finer control if we go down to the black and white treatments in HSL, color and black and white, and make these fine-tuned adjustments for each of these appropriate channels.
Another way to make these adjustments is to use this selector tool, click on it, and make direct adjustments to the image itself. This way, we have much finer control over the kind of black and white look we're going to have. So I hope this section has been helpful about how you can make black and white images in Adobe Photoshop Lightroom and how you can go on further and tweak the black and white images using the channels sliders, and make those fine-tuned adjustments to ensure that your images have that impact that you want.
Full Course and Free Book
-

Adobe Photoshop Lightroom Classic
Course5.0 average rating (1 review)Are you a professional an amateur or an aspiring photographer or a digital artist? Impress by creating breathtaking photos with Photoshop Lightroom Classic CC. Learn hands-on techniques from one of the best photo editors there is.
Purchase$1 / month
-

Adobe Photoshop Lightroom Classic Book
CourseAre you a professional an amateur or an aspiring photographer or a digital artist? Impress by creating breathtaking photos with Photoshop Lightroom Classic CC. Learn hands-on techniques from one of the best photo editors there is.
Free