Adobe Lightroom Classic Crop & Straighten Adjustments.
About Lightroom Crop & Straighten Adjustments.
Product: Adobe Lightroom Classic | Subject: Adobe Photoshop Lightroom Classic
In this exercise, we will learn about Adobe Lightroom Classic and how to Crop & Straighten Adjustments.
In this section, I want to share how you can use Adobe Photoshop Lightroom to crop and straighten your photos. In this example, I'm using this image of this blank notebook.

You can find the image under your books folder. I picked the image because the image could do with a little bit more excitement for the viewer. So that's why I'm going just to adjust the crop. I'm going to adjust the angle, the way you access that is you go into the tool strip and select the crop overlay tool.

Remember, we are in the develop module, and we are working with the tool strip. We are going to go to the crop overlay. You can also open it up by clicking the shortcut key R on the keyboard. You will notice that once I open it up, a few options open up in the right panel and a grid on the image. For me, this grid is quite handy because it works with the rule of thirds in photography. Usually, it's these points of intersection that are most interesting. So for me, this image is kind of dull and boring because it's in the middle. I want to move it out of the way so that the main subject of interest, in this case, the notebook, is somewhere off to the side, and it's going to catch my attention. So I'm going to adjust using any one of the corners to the left, to the right to the bottom, and within the corners to adjust the cropping.

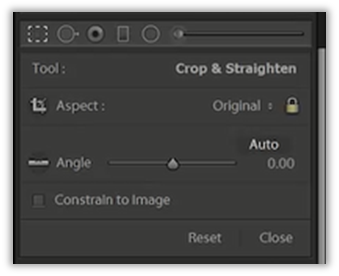
Now you will notice when I adjusted using one of the handles, the cropping adjusts simultaneously in all directions. That's because we're keeping the aspect ratio the same as the original as it was shot in the camera, and we have locked the ratios.
So as we adjust one handle, all of the other handles are going to adjust themselves. To give yourself a custom crop view, you have to unlock the ratios, then each of the handles will be adjusted independently of the other.
Next, I want to give you a few more cropping options. If you select on the aspect, there is a drop-down that says original. If you select it, there are just a few more options that become available to you.

The crop adjustment will change accordingly. When I choose 1×1, essentially, what I'm doing is making a square image. These square images are kind of nice, especially if you want to post them on Instagram as thumbnails or Pinterest or some other social sharing site for your photos. So it's kind of help that way. Another helpful aspect ratio is the 4×5 or 8×10. These ratios work best with portraits because they have a very nice ratio. They give a nice dramatic look to the image. You can see that the crop has already been constrained within the proportion of the image. Whatever is selected is what you're going to see in the end. Now, this 4×5 is not quite suitable in portrait view.

But if I want to change the orientation, I can click on X on the keyboard and switch it to portrait view. So it gives me a much tighter view of the 4×5 or 8×10 If I so chose.

Another aspect that you can work with is the 8.5×11. This is a US paper. Then there is 5×7. This is slightly bigger than the 4×6 or the 2×3 ratio. But these are different types of aspect ratios that you can use, especially if you want to maintain that crop ratio to ensure that your images can be sent for processing. Finally, other ratios are 4×3. I do not recommend this is for much older monitors. 16×9 if you wanted to make wallpapers for your 1080p, 1440p and 4k monitors. Then 16×10 is a more cinematic and theatrical type of ratio. Those are what the aspect ratios are and the kind of cropping that you can work with. So let me go ahead and make a few changes here. So that I can make this image have a little bit more oomph that I want it to give. How do I do that? Well, I'm going to change the angle of these images. As I hover over the image, my cursor changes slightly to like these double-sided arrows. If I click on the outside of the image and move left or right, I notice that I'm tilting the image, giving it a little more fun and changing the angle. This is fun to do if you wanted to do it. You will notice if I exaggerate it, the cropping will adjust to fit into the actual image itself. So I'm going to give it a little bit more tilt. You can see I've adjusted the angle by 5.5 degrees.

The numbers represent the degrees that I've actually tilted the image, and I've tilted the image five and a half degrees clockwise. The sliders move from 45 degrees clockwise to 45 degrees counterclockwise. One thing that you will see is that as you move the sliders left and right, the cropped area adjusts itself so that the entire crop is within the image and is constrained by the image right there. So I'm going to leave it as I had it before, which was about five and a half. I kind of liked it. I'm just going to make maybe a few more adjustments so that this image becomes a little bit more interesting to me. Now, I'm going to hit Enter. Then this is my final cropped image.

To quickly recap, In this section, we covered the crop overlay tool. You can find that in the tool strip right below the histogram. It is the very first tool. You can access it by clicking on the crop overlay tool icon or by using the keyboard shortcut key R. Once you have access to the tool, you can choose the crop by way of the ratios that you actually want to have for your final product, or you can choose to unlock it, and then adjust the crop ratio in the way that you want. I'm just going to leave it as the original. The second adjustment that is available to you within the crop overlay is to change the angle of the image. When we use the slider and move it to the left, we're rotating the image counterclockwise, and we can rotate the image counterclockwise by a maximum of 45 degrees. When we move the slider to the right, we're moving the image and tilting the image 45 degrees, the maximum to the right or clockwise. I'm just going to go ahead and undo that and leave the image as it was.
Full Course and Free Book
-

Adobe Photoshop Lightroom Classic
Course5.0 average rating (1 review)Are you a professional an amateur or an aspiring photographer or a digital artist? Impress by creating breathtaking photos with Photoshop Lightroom Classic CC. Learn hands-on techniques from one of the best photo editors there is.
Purchase$1 / month
-

Adobe Photoshop Lightroom Classic Book
CourseAre you a professional an amateur or an aspiring photographer or a digital artist? Impress by creating breathtaking photos with Photoshop Lightroom Classic CC. Learn hands-on techniques from one of the best photo editors there is.
Free