Adobe Lightroom Classic exporting
About exporting in Lightroom
Product: Adobe Lightroom Classic | Subject: Adobe Photoshop Lightroom Classic
In this exercise, we will learn about exporting in Adobe Lightroom Classic
Step 3 – Export
This section is the continuation of this workflow series, and this section will cover the third part of my sample workflow, which is the export process. In the previous section, what I did was I imported all the photos that I had on my media card from the shoot that I did early today, which was just a wake up in the morning. Just before sunrise captured the cherry blossoms captured some flowers around in the neighborhood. I flagged all those photos. I worked in the development module, and then I quickly put them into a collection so that I'm going to prepare them for export as a showcase as part of my online web portfolio.
Now, these photos are in the collection called cherry blossoms in the morning. And if you recall, the collections are very neat, because you can have your custom order. You can rearrange the photos. For example, you can mix the colored photos with black and white photos. All of these photos have been rearranged in the custom order and can be seen within the filmstrip.

They've also been rearranged a couple of portraits and landscape orientation. Then very quickly, what I'm going to do is I'm going to go to the web module.

In the web module, I will choose the Lightroom UI and just keep the outline/template because I'm not going to cover how to use the web module until another section. So in this section, I just wanted to show you and demonstrate to you what I use for my workflow. So very quickly, I'm just going to leave it like it is, and then I'm going to hit the Export button. Then it will ask me where I want to store this web gallery.

We can choose to store this anywhere, but let's just leave it here in the Lightroom catalog. It's not quite a catalog, but it's just an easy place for me to store it right now. So I'm going to call it Cherry blossoms, and then I'm going to hit Enter. Then Lightroom is going to go ahead and save the web photo gallery. So if you click on it, it will tell you what it's doing. It's exporting each of those images into that format that makes sense for whatever module export module I've chosen.

In this case, it is for the web module. Once it finishes, it will let me know that it has finished. Then it will be available for me to go ahead and upload it into my webserver. That's it for the third step, which is the export step in this three-step process. The example that I showed you was to export it as a series of HTML pages and associated images that I can easily upload onto my online portfolio. Now, these images, you can, of course, post them to Facebook or Flickr or something else, where you want to showcase your work. But in this case, the web module will export it to a series of HTML files that you can upload to your web server.
Other ways to use the export part of this workflow are publishing a book, publishing all of the images as part of the slideshow, print it somewhere else, and using some services to do that. This was just an example because I rarely use the web module. I will export all of these files onto my hard drive with certain predefined settings so that I'm going to take all of those images and go to the print shop and print them or send it online to make them into a canvas or something like that.
I hope this section has helped give you an idea of a sample workflow that I use to get my work from the camera from the memory card to the finished product. If you do have any questions, please don't hesitate to reach out. I am here for your continued support and your continued learning.
|
Exporting Photos
In this section, I want to talk to you about how to export your photos. Now exporting your photos is the third and final step of that three-step workflow process mentioned in this series. The first step was the ingest process, where we import all of the photos into Adobe Photoshop Lightroom as a catalog. The second step is the digest process, where we will add keywords, tags, metadata, and then, of course, work with creating adjustments to those photos. We haven't talked about making all the adjustments in the develop module because that's the bulk of where we're going to spend our time with the photos. But very quickly, I want to show you how you can get your photos exported so that you can showcase your very wonderful work, and get kudos for all your skills such as your photography skills, your portrait skills, your retouching skills, and any other skills that you want to showcase.
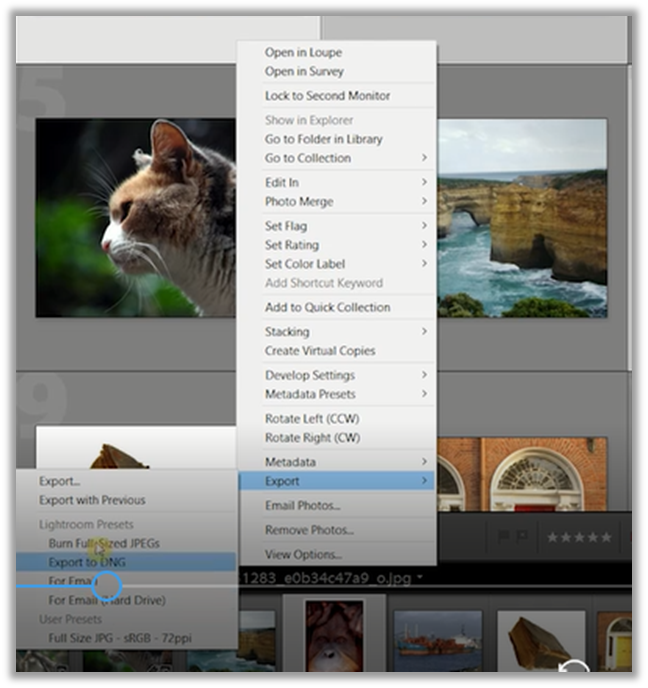
So what do we need to do before we can export any of our photos? First of all, we have to choose at least one photo before we can export it. So you can choose one photo, choose some photos, or choose all photos, and it doesn't matter where your photos are. Typically, this is where we'll get into the workflow that will create collections, and we will export all of those photos from that particular collection. You can export your photos in these ways:
- Once you've chosen your photos, you can right click on the photos, and choose to export, and then choose the export setting or some of the presets. We'll talk about presets in another section.
- Or we can go to the File menu and choose to export.

- Or we can use the hotkey Ctrl + Shift + E.
- Another way to choose to export your photos is to go down to the filmstrip, and then right-click on it and choose to export the photos.

- The final way to export your photos is to go to the left-hand panel and choose the Export button.

However, you choose to export your photos. Once you click on that, you will be presented with the exporting dialog. The export dialog will look like the one shown below.

But in your case, all of these fields may be open. But I'm just gone ahead to open it up to show you what it is and get you quickly started with exporting some photos. The best way to work with the export settings is to choose one of the presets. Then it will adjust all of the parameters for each of these sections. I'm just going to choose right now for email on the harddrive. So let's click on that.

It will make these adjustments, but it's going to export to the hard drive. This is the export location. It's going to export to the folder. Once you click on the Export Lightroom, you will ask where you'd like to save all those folders to your hard drive. Let's minimize that. Then it's going to ask whether or not you want to rename the files. We're not going to worry about that. This is not video, so we're just going to not worry about that. Now you'll notice this preset will choose the JPEG format in the sRGB color space with a 50% quality reduction; that's fine for us. Then it's also going to be resized. But those images' maximum width and height are set to 640 by 640.
Since this is an email setting that we chose, 640 by 640 is pretty good for emails. You'll get a nice small file size and yet big enough to be viewable on the screen or a mobile device. So these parameters are quite handy. We don't want to enlarge any folders that are smaller than this. And then, we'll set the resolution to 72 PPI. Now, this preset doesn't sharpen for anything. But if we want, we can choose to sharpen for the screen since we are emailing it. Most people are going to look at their emails on their computers or their mobile devices. We will sharpen it for screen with a standard amount of sharpening.
Let's minimize those two. Now in the metadata section currently, it only includes the copyright information. You can choose several bits of information that you want to include as part of your metadata. But copyright is the most restrictive. Let's keep it as it is. We'll minimize that. And in terms of watermarking. Since we're only sending it at 640 by 640 pixels, there's probably no need to add a watermark. So we'll minimize this. Finally, after Lightroom finishes the export in post-processing, we're going to show it in our explorer window. Let's click Export. Now Lightroom is asking us where we want to save those selected images. Let me just go to my pictures folder. Then I will choose to create a new folder, and I'll call it exports.

Then I will select that folder. Then Lightroom is just going to go ahead and export all of those folders. You can very easily see that once it has finished exporting all of those photos. It will open up the folder in the Explorer window to see which of the folders and which of the photos we exported.

If you hover over each of those photos, you can see their dimensions. They are 640 on the longest dimension, and file sizes are quite small. They can be very easily attached to all of the emails you want to send these photos. So that's that for exporting new photos. It's quite a simple process. Now in that example, I exported four photos that I had randomly clicked on it. Now I'm going to give you another example of how to export photos. This time, I'm going to show you just how easy it is and how fast you can do it. Earlier, as you will recall, I mentioned that the best way to export your folders is to work with the collections. Let's choose the flora collection that we have already created. We're going to Ctrl + A to select all the photos. We're going to right click on one of the photos. We're going to choose Export.

Since we've already chosen that previous preset, we're going to just click on Export. Lightroom is going to ask us where we want to store it. We'll go to the pictures. We'll choose the flora exports folder that I already created. Then we're going to select it. Lightroom is going to export all of those files there. Then, it is going to open it up once it's done. And once again, you can see that each of the files. They are very small file sizes, and they're at the 640-pixel image.

So that's a very easy way to export your photos.
I hope this section has been helpful about how you can export your photos using Adobe Photoshop Lightroom. As you can see, the export process is quite a simple process. All you have to do is, number one, select the photos that you want to export. Choose to export those folders, find an appropriate preset, and choose Export, and then Adobe Photoshop Lightroom will take care of the rest of the particular results.
Full Course and Free Book
-

Adobe Photoshop Lightroom Classic
Course5.0 average rating (1 review)Are you a professional an amateur or an aspiring photographer or a digital artist? Impress by creating breathtaking photos with Photoshop Lightroom Classic CC. Learn hands-on techniques from one of the best photo editors there is.
Purchase$1 / month
-

Adobe Photoshop Lightroom Classic Book
CourseAre you a professional an amateur or an aspiring photographer or a digital artist? Impress by creating breathtaking photos with Photoshop Lightroom Classic CC. Learn hands-on techniques from one of the best photo editors there is.
Free