Adobe Lightroom Classic GPS Metadata & "Map" Module View
About Lightroom GPS Metadata & "Map" Module View
Product: Adobe Lightroom Classic | Subject: Adobe Photoshop Lightroom Classic
In this exercise, we will learn about Adobe Lightroom Classic
GPS Metadata & "Map" Module View
In this section, I want to take a few minutes to explain to you yet another bit of metadata information that you can use. And this time, work with the map module. The metadata that I'm talking about our GPS coordinates. Now let's take a look at the library, and let's take a look at the images in the France folder. You'll notice that some of these images have this little thumbnail badge that looks like a pin.

If you hover over it, Adobe Photoshop Lightroom will tell you that it has GPS coordinates.

These GPS coordinates are yet another bit of metadata information, and more specifically, location metadata information. But let's go and find out the metadata information in this image. So let's open it up here on the right-hand panel. And you will scroll down here until you notice that the GPS coordinates are here.
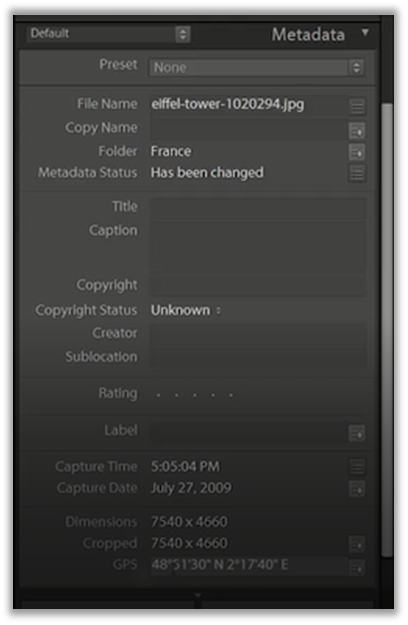
The notation that is used is degree, minutes, and seconds. And first of all, it's latitude. And then longitude. And latitude is north-south, and longitude is east-west. And this is the standard view of the GPS coordinates. Now, what if you want to add all of the GPS coordinates to these images? Most smartphones and smart devices are GPS-enabled. Any time you take photos with the smart devices, you add all that metadata to your images, including GPS coordinates. Those images you bring into your library will automatically have the GPS coordinates. But what if your library is from several years old, or you use an SLR camera that doesn't have the GPS coordinate system? One way you can do this is to search for the GPS coordinates of the areas you visited. For example, in this case, let's once again use France as an example. One way to find GPS coordinates is to go to the Wikipedia and find out where that information is. Now what I did was I searched for the Eiffel Tower here. And then I scroll down until I found the coordinates here.
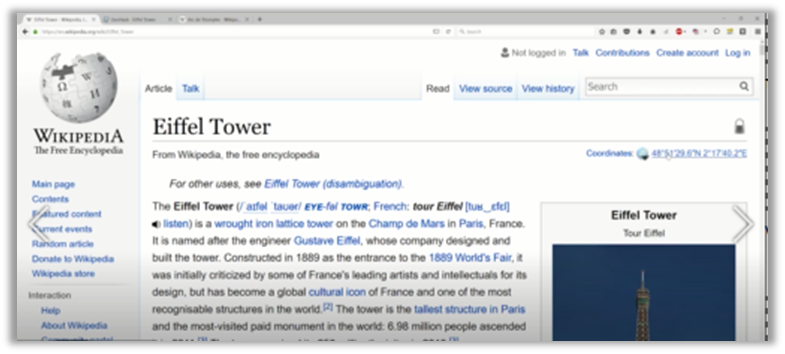
So when I clicked on here, it took me to this view hack websites, which is https://tools.wmflabs.org/

And you'll notice that the GPS coordinates are right on top. It's 48 degrees, 51 minutes, 29.6 seconds north, 2 degrees, 17 minutes, and 40.2 seconds East. Another view of the GPS coordinates is the decimal notation. So, one thing that I do is I just copy this information here. And then, I will go back to Lightroom, and I will enter the coordinates of this place by selecting the GPS field and pasting that information. But when it paste, it's pasting it in decimal notation. But when I hit Enter, it converts it to degree, minutes, and seconds.
Another example that I can give you is the Arc de Triomphe. Now you'll notice it has no GPS coordinates. Then, I will go to the Wikipedia for Arc de Triomphe,

I will click on the coordinates, and it will open up a new tab, which will give me the GPS coordinates for the Arc de Triomphe. In this case, I want to once again copy the decimal notation, in this case, Ctrl + C to copy,

Then, go back to Lightroom, paste it into the GPS label in the metadata field, and select Enter. And it will right away add these coordinates to the image. You can see that the thumbnail badges saying that this photo has GPS coordinates. So now that we've added GPS coordinates to our images, now what? Well, I think this is where the power of the map module comes into play. In an earlier section, I talked about how you can enable the address lookup. If you've disabled it, you can go ahead and enable it so that Adobe Photoshop Lightroom will work in the background and easily make all the changes necessary to the catalog to view it on the map module. And before we go to the map module, let's select the entire images folder so that the map module will show us all of the photos with GPS coordinates. So, we'll select it and then select the map module.
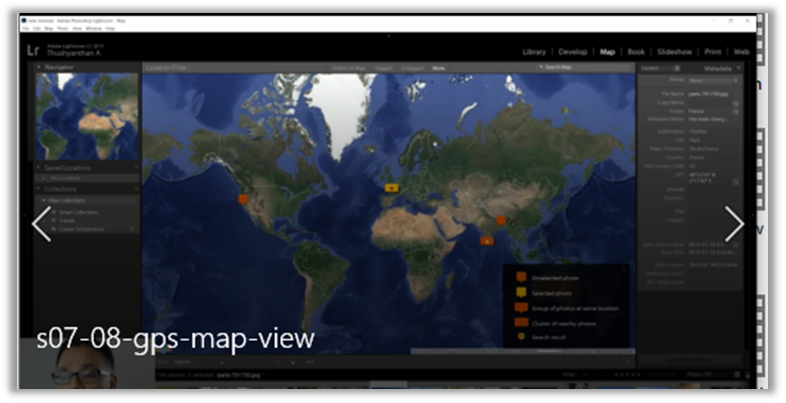
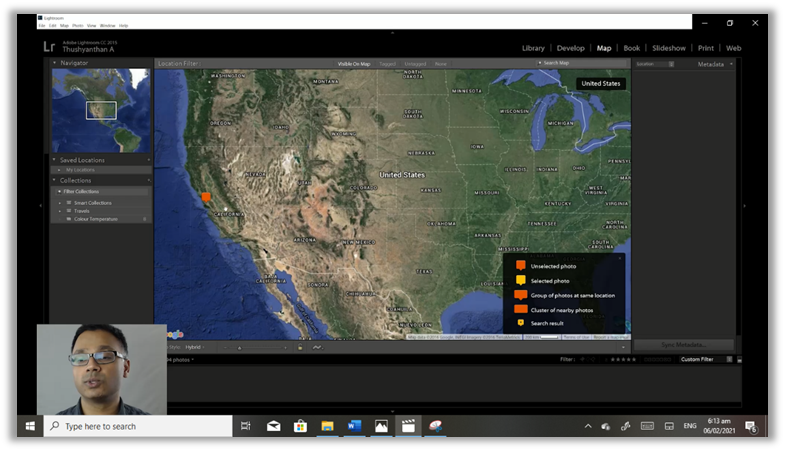
You will notice right away that it puts pins on the locations that it has found GPS coordinates in. And there's a handy legend that shows you that these are unselected photos. If you want, you to just click on the photo. It will show you which photo will highlight that photo on the filmstrip. And it'll tell you that photo was taken at this location.

From this view, it's very easy to see a list of your travels or all of the images you've taken as you go throughout the world. So, it's kind of a fun view. Based on this legend. There is another view, which is a rounded rectangle that shows you a cluster of nearby photos.

So, in this case, we can see that there's a bunch of photos here. This was in France. There are a bunch of photos here, which are in India.

So, let's go ahead and take a look at the photos that are in France. And right away, when you click it, it selects the group of photos, and it will highlight the photos for you down in the filmstrip.

If you click on it again, it'll show you all of the images that exist within that group. And you can use the arrow keys here to scroll back and forth through all of the photos you've enabled within that group.
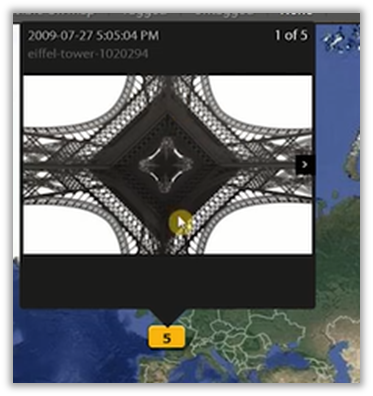
Every time you click and scroll, you'll notice that the filmstrip moves along. What you can also do in the map module is scroll very close to that area you want to work with.

So you can see that some photos were taken in England, some photos were taken in France, more were taken in Paris. These are all of the Eiffel Tower photos, for example. The map view is quite handy if you just want to glance at all of the photos with GPS coordinates enabled. Now, this is just one style of the map view. Other map styles are down here where you can choose from the roadmap, or you can choose to satellite, choose a terrain, choose a light or a dark view. Let's select the hybrid view again because it's the one that's kind of handy. One thing I do want to point out is the location filter bar up. Now there are only four options. The first one is none. And the rest are untagged, tagged, and visible on the map.

Each of these will filter all of those images to the appropriate filter that you've set. For example, if I click on visible on map filter, it will show all of the photos inside the current map location. So the filmstrip will adjust. And it will say that of all of the 194 photos that we had. There's only a limited subset. As we zoom in, the filmstrip will update because it will show all of the available photos on the visible map.
Now let's click on the tagged photos. And the tag Photo Filter is the one that will show all photos that have GPS coordinates. You can see it here. These are images down on the filmstrip. They've been grayed out because they don't have GPS coordinates. As we scroll to the right, using the scroll bar, we'll see those images that are highlighted. Well, these are the images that have GPS data.

The next one is, of course, the opposite of tagged. It'll show on the filmstrip all photos that don't have tags. You can see many more photos that don't have tags than photos that do have tags.

Let's recap what we learned in this section. We learned how we work in the library module, we worked with certain images, and we added GPS data and coordinates. We found the GPS data and coordinates by searching online. In this case, we searched on Wikipedia. We found the coordinates, we clicked on them, and we got the decimal notation.
Afterward, we copied that decimal notation information. We went into Lightroom, and we went into the metadata field or the GPS coordinates, and we just entered it in. It converted that decimal notation into degrees, minutes, and seconds. Once the GPS data was enabled for that photo, we then went to the map to give us a list of all of the photos that were available in that view. Since I was in the France folder before I clicked on the map module, it will only show me all the images tagged with GPS coordinates in the France folder on the hard drive.
I hope this section has helped you work with GPS coordinates. How you can search for GPS coordinates, enter them in Adobe Photoshop Lightroom. If you do have any questions, please don't hesitate to reach out.
Explaining Metadata
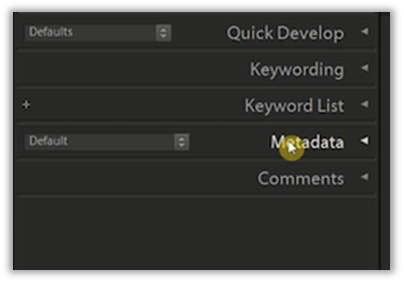
In this section, I want to spend a few minutes talking about metadata and how you can use metadata with Adobe Photoshop Lightroom. In an earlier section, we covered a few examples of metadata such as names that we attached to the people view, such as keywords that we attach to the images, and a few other things. We also talked about how we can search on metadata in the library filter toolbar. Now, these are all just a few bits of metadata information that is stored with an image. To show you what metadata is, let's go to the right-hand panel and open up the metadata section.
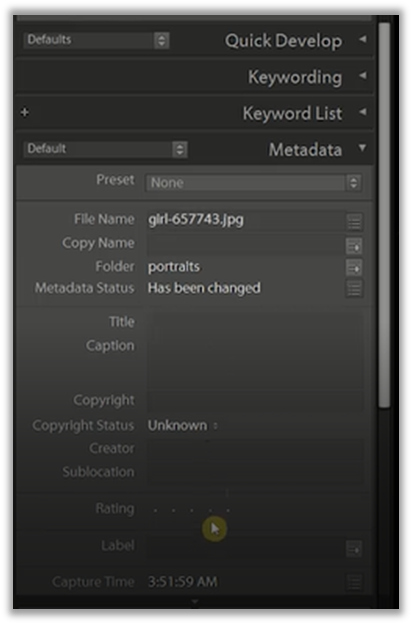
We will go ahead and click the triangle and show you what it means. You can see that some metadata includes the file name, includes the copy name, includes the folder that it exists in. And just a little bit more information.

You'll notice that ratings are also part of metadata. Labels are part of metadata. With the EXIF data, we are interested in capturing time, image dimensions, and other camera types of details, such as exposure, focal length, ISO, Flash, etc. These are just a little bit of the metadata that you can edit to manipulate while you're in Adobe Photoshop Lightroom.
The other thing that I want to point out is that there are several views of the kinds of metadata that you can manipulate within the metadata. The default metadata view in Lightroom is the default set. But if we click on this drop-down icon, we can see several different metadata sets we can work with, including Section.

But let's go ahead and just take a couple of moments to scroll through all of the metadata. And let's click on all the plugin metadata to show you what it shows. All plugin metadata only has a little bit of information. It has the file name, the copy name, and the folder that it exists in.

If you want to edit some of these presets to apply to an image or a series of images, you must select to edit the presets. And it'll pop up with a dialog with custom preset information, where you can fill in basic info, camera info, IPTC, content, copyright, and just a whole bunch more information.

Metadata becomes very helpful, especially if you're not the only one working with images. It helps when you're working with media when you're working with PR firms and things like that, where you need to just give a lot of information with that photos so that you can have proper attributions, you can have proper copyrights. All sorts of proper licenses can be attached with the image. But that's just one way to use metadata information.
Another view in the metadata is the DNG view. DNG stands for digital negative. And you can see that this image has no information about the DNG view.

We'll select another view, and that is EXIF information. EXIF information is the information I sort of mentioned earlier that has to do with the image itself and the camera that it was taken with. In this case, the file name where it's located, its dimensions, whether it's cropped or not, all sorts of camera information such as exposure, focal length, as well as GPS, altitude, and direction coordinates.

Another view is the EXIF and IPTC view. IPTC is a consortium of press agencies. These are news agencies around the world, where you get a little bit more information about the contact information about the creator, the job title, where it was taken, and other sorts of information that is relevant to giving credits giving attributions to that image, if it's used in a news publication. That's just a little bit of iptc. And this is Exif and iptc. So it is camera information plus the rest of the other information.

Let's take a look at another view, which is IPTC. IPTC has so much more information about the creator's contact information, who the news agency is, and what article this image was used for.

Lightroom gives you a great way to manage huge volumes of images. Suppose you are working in a media organization; you need to work with large volumes of images and give you an easier way to work with headlines, descriptions, news articles, and images.
Another preset is going to be iptc extensions. These extensions have become a standard that you can add just a little bit more information. For example, artworks or objects, you have to know the ages of the models that are included in there, some administrator information, as well as a few other things that will help, especially with the distribution of the images.

The next view is that of large captions. Captions are important when you're working with slideshows, or even the web view, so that every image has its description that you want to type. That shows up when people are viewing the image online. The large caption view is just for entirely the caption box where you can type in anything about the image itself, where you want to tell a story, or where you want to have a narrative or the viewer to enjoy.

The next view is the location view. And this view has a lot to do with where in the city, province country, GPS codes, altitude directions, and other sorts of metadata about the location of where that image was taken.

The other view, of course, is the minimal view. This is just the very basic information, including the file name, the rating, caption, and copyright.

Now, you will notice from the previous large caption box, this caption box just a one-line thing, but you can continue to keep typing, and it'll show up in the large caption box as well.
Another view, of course, is the quick describe, where you get to give a little bit more information about the image itself.

Then finally, the last view is for video. Since this course is mostly about images, we're not going to cover it. But the video has a lot of information about speakers, who the composer is for the music, and other sorts of shots and angles and things like that, that are relevant to the video industry.

So most often, you will be working with the default information, or even potentially Exif, and maybe even location. For now, let's work with the default. You will see that we can add a title to this image, add a caption, add copyright, add just several bits of information that we want to when we're working with metadata.

Well, I realized I'd given you a whole bunch of information about how to work with metadata and how to use Lightroom to manage all that metadata. This becomes important in certain industry fields, such as the news agencies or other big large agencies that work with large collections of images. Now, you don't have to use all of the metadata fields. You'll probably use the ones that make sense to you. So the invitation once again is to use metadata information that works for you that works for your images that work as part of your workflow in the same way with working with keywords.
So I hope this section has helped give you an idea of the kinds of metadata that you can attach to an image or even a video that makes sense to you. Once again, if you do have any questions, please don't hesitate to reach out.
Library Filter - Metadata And Text Attributes
In this section, I'm going to spend a few minutes talking about what you can do with all of that metadata that you've entered; you've manipulated, and you've changed in your Adobe Photoshop Lightroom catalog. Now the best way to work with all the metadata I found is to use the library filter. Once again, if this is not enabled, you can select the View and then click the show filter bar. The keyboard shortcut is the backslash key.
Now, what we want to work with when we're working with metadata, or what do we want to sort on? Well, we've already taken a look at the metadata, where we talk about keywords, camera lenses, and labels. We've already talked about attributes where we work with flags, ratings, and color labels. Finally, we're going to work with the text attributes using the library filter. We can now use a drop-down box to select any searchable field, file name, copy name, title, caption keywords, searchable metadata, searchable, iptc, searchable, Exif, and any searchable plugin field.

So let's just search for any searchable field. The text will search with many different kinds of information and metadata associated with an image. For example, let's search any searchable field that contains the word India. Now all of the images that have India, somewhere in any searchable field, will show up in this view. So, for example, this photo here in this file is called color.

The reason it shows up in this India view is because it's located in the India folder. With this text search on the library filter using the India keyword, it returns 34 out of 194 photos, yet the India folder only has 31 photos. So how else does this search? Well, as you know, this text search searches on any searchable field. For example, in the photo below, based on its metadata, the filename is just a series of numbers and letters. It's actually in the images folder, and yet and its title is dancing ballerina, yet, it comes up in the India text field.

That's because among the keyword lists for this photo is India. You notice that the India in the keyword is capitalized, whereas the India in the search field is not capitalized. So the search, in this case, is case insensitive. This is another way to quickly search and go through all of your images based upon metadata that is not part of the attributes, not part of the keywords or the cameras or the lenses. Yet, they have some pertinent and relevant information to the information you want to find.
I hope this has helped you work with all of the metadata information to get a grip and manage 1000s 10s of 1000s of images very quickly with Adobe Photoshop Lightroom. Once again, if you do have any questions, please don't hesitate to reach out.
Brief Overview Of IPTC, XMP, EXIF Metadata
In this section, I want to spend a few minutes talking about metadata and how Adobe Photoshop Lightroom uses this information. This is not directly related to Lightroom, but it does give you some context so that perhaps you have a better idea of how metadata is stored of how Lightroom can use metadata, and how you can use metadata. In another section, I talked about three different kinds of metadata information. I talked about IPTC, which stands for international press telecommunications Council, and iptc is a consortium of major news agencies worldwide. Now IPTC was established in 1965. So it is quite an old standard.
Now, Adobe has taken some of the core bits of IPTC and has moved it into something called the extensible metadata platform. That is what we know as XMP. XMP stands for extensible metadata platform and is an ISO standard created by Adobe Systems Inc. And this was created in, I believe, 2001. Since XMP is extensible, there's a lot of information that can go with XMP data. And this is where we get into Adobe Photoshop Lightroom, extended information for IPTC, and all sorts of other metadata that we covered in another section. Finally, the third information regarding metadata is Exif.info. Exif.info stands for the exchangeable image file format. Originally, Exif was created for use with scanners, but it wasn't used standardly. But Exif becomes very helpful, especially when you're working with digital cameras because all digital cameras will add their attributes to the metadata of all the images that they take. For example, point-and-shoot cameras, your cell phone cameras, your tablet cameras, and all sorts of other digital imaging devices will automatically create Exif info.
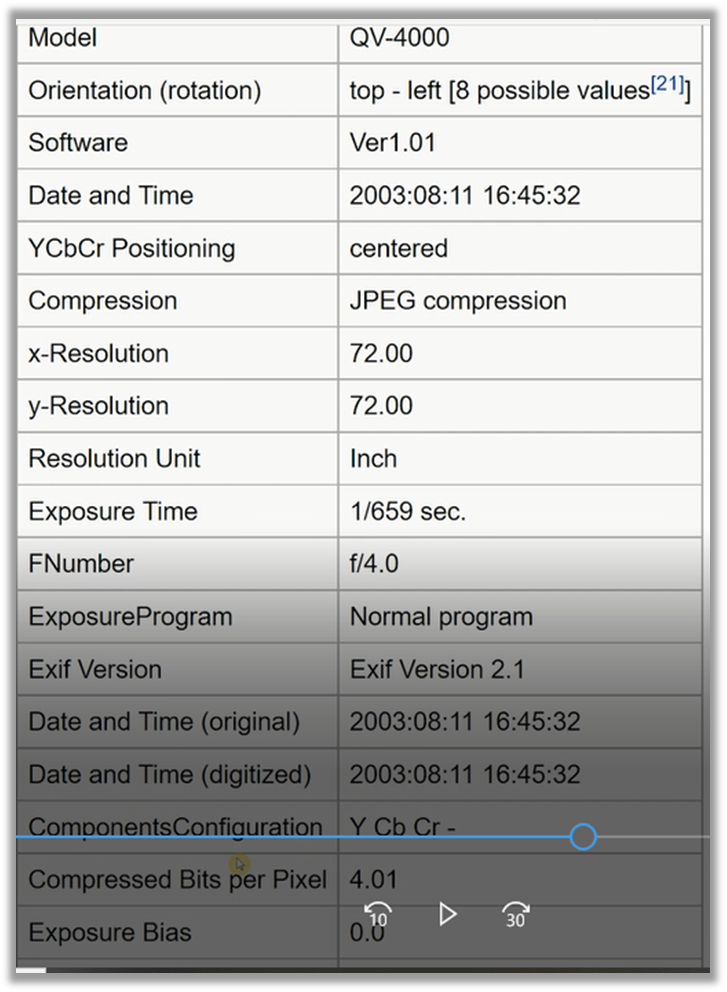
For example, let me show you what an example of an Exif info block looks like. These are usually tag, and value pairs that show up in the file itself placed in a header before the actual digital image. And you'll see that the tags include manufacturer model orientation and just a whole bunch of information stored in this Exif of header.
You can very easily see how one single Digital Photo has a ton of metadata associated with it. That's part of the Exif information. That's also part of the IPTC standards, and that also includes a lot of XMP data. Now XMP is how Adobe uses all of this metadata and associates it with each of the images. The more you work with metadata, the more you'll understand that metadata is about sorting, collecting, working with keywords, and essentially a way for you to filter through more easily and search for certain bits of information that become relevant to you. Now that we're back in Adobe Lightroom, you can see the metadata that Lightroom is working with. All of this metadata is associated with an image in the library.
If you wanted to, you could export an image with all of this metadata attached to it. That's, of course, going to increase the file size of the image. As you pass around these images with their associated metadata, to other individuals, other agencies, and such like that, you can see how very easily when they have a metadata reader like Lightroom or some other reader, they can work with all these images, have some sort of contact information to get back to you have some sort of attribution information that they can use, when they're writing their articles, their headlines, and so forth.
I hope this section has helped you with the kind of information, the kinds of metadata available, and the metadata that Adobe Photoshop Lightroom works with, particularly yourself.
Full Course and Free Book
-

Adobe Photoshop Lightroom Classic
Course5.0 average rating (1 review)Are you a professional an amateur or an aspiring photographer or a digital artist? Impress by creating breathtaking photos with Photoshop Lightroom Classic CC. Learn hands-on techniques from one of the best photo editors there is.
Purchase$1 / month
-

Adobe Photoshop Lightroom Classic Book
CourseAre you a professional an amateur or an aspiring photographer or a digital artist? Impress by creating breathtaking photos with Photoshop Lightroom Classic CC. Learn hands-on techniques from one of the best photo editors there is.
Free