Adobe Lightroom Classic Keywords
About Lightroom Keywords
Product: Adobe Lightroom Classic | Subject: Adobe Photoshop Lightroom Classic
In this exercise, we will learn about Adobe Lightroom Classic Keywords.
This is the overview for the section where we will cover keywords, metadata, and the people's view in Adobe Photoshop Lightroom. The keywords become very helpful, especially for tagging photos and adding people's names to portraits and other sorts of keywords or other metadata that you want to add to your photos. This is helpful when you want to filter through many hundreds of 1000s or even 10s of 1000s of photos in your library.
In this section, we will be covering how to search on the metadata within the library filter and some of the text that is available for some of the metadata also that you can add to your images.

Keywords
In this section, we're going to talk about keywords and how you can use them. To work with keywords, I want to direct your attention to the section here on the right-hand panel where it's talking about keywording. If it's not already open, just click on the triangle to open up this section. You will notice this section this keywording section has three sub-sections. And they are keyword tags, keyword suggestions, and keyword sets.

Each of these three sections has its triangle here that you can use to click and open it up. So go ahead and open up the keywords tags one. This is the one that we're going to make use of right away. Now you'll notice that this is the selected image here on the filmstrip as well as on the navigator. And this image already has a few keywords at feline housecat and indoor.

This orangutan here also has an animal orangutan zoo.

Now let's see if we can find another image we can work with and add some keywords. But let's click on this one here; you'll notice that there aren't any keywords. There are two areas that you can use actually to add the keywords. You can add the keywords by clicking here to add a keyword. But let's go ahead and type in canine, and you'll notice that the keyword showed up in the box that means Lightroom has encountered you typing in the keyword before. So you can go ahead and click the tab to select it and press Enter. We can type in a keyword by going into the box and type in a keyword there. Another keyword that we've typed in before is something we'll click comment here, and we'll put a dog and dog is already there, we're going to select it, and we're going to hit enter there. Another keyword is going to be a zoo.

In an earlier example, Lightroom noticed that I had misspelled Zoo before. So let's go ahead and select the misspelled one. And what we can do if we've made a mistake is to go into the enter keyword box and just delete that information there. So that Lightroom has the proper keyword spelling for that. You can enter keywords by either going into the box here or clicking here and adding keywords in another section that you will notice is that keyword suggestions section. Let's go ahead and open it up. You will notice nine keywords that Adobe Photoshop Lightroom thinks would work for any of the images you're working with.

They usually come with the most recent keywords or those that have the most keywords applied to them. Let's select this photo of this little puppy here. We can click on the dog, and it'll apply that. And it's also in the indoor photo. So we'll say it's indoor. Now, the canine is there too. So we're just kind of click that. And then perhaps we can add something else. We can call it a husky. That's what's handy about having these keyword suggestions.

The third area that we can use to add keywords is to go into the keyword set. We can open it up, and I'll show you what I mean by that. Once again, the keyword set is similar to the keyword suggestions in that there are nine different keywords that you can use. So this is portrait photography, and portrait photography has these nine keywords associated with it.

If you click on the drop-down here, you can select recent keywords or other groups with keyword sets you've created for yourself.

Let's just keep it at portrait photography. We'll select pets here. We'll add pets up there. And then maybe it's let's say it's a candid shot, right, and we can add keywords and continue in this manner. If this is about animal photography, you might want to create your own keyword sets. We will get to that in another section when I talk about keyword sets. So in this section, we covered the keywording section of the right-hand panel, and that's to add all the keywords. We work with the keyword tags by adding keywords either in the box or within the selection here. The second thing that we worked on was using the keyword suggestions to see which keywords were appropriate for our use and the image we've currently selected. I hope this tutorial has been helpful, and if you do have any questions, please don't hesitate to reach out.
Keyword Sets
This section will talk about keyword sets and how you can work with them to add keywords to your images quickly. In the previous section, we left off with this keyword set and talked about portrait photography. Now I want you to go into your portraits folder and look at the list of images you have there.
We're going to work with the portrait photography keyword set, or rather the keyword set, and use the kinds of keywords appropriate to you and your workflow and apply them to those images there.

One of the things that we can see right off the bat is that we can see that we can click on the photos and just add keywords based upon this Portrait photography keyword set.

The way to work with the keyword sets and edit them or add your own is to just go to one of the keywords sets and pick one and then choose to edit the set.

You will see that the preset that we just chose was portrait photography, there are nine different portrait photography keywords that you can use, but you can also change them.

So let's go ahead and change one of these too, say, studio9. Now I entered studio9 here as a keyword.

Studio9 is just a keyword that I use for my workflow. And you'll notice that I've just finished typing and I didn't do anything with it. But let me just go ahead and add another one. And you will notice that once this has been set, it'll say that the portrait photography preset has been edited.

But let's just keep it like this. And what we can do is we can either change the existing portrait photography preset, or we can save the current settings as a new preset, but we're going to call it something.

Because I have two screens, the changed dialogue appeared on my second screen, which is why you'd have to drag it over. Let's call it something else. And we'll call it studio9 preset. You'll notice that the studio9 preset is applied here has got studio9 as one of the keywords. And this is available to be selected here in the drop-down menu.

So let's choose that. We'll say this was these three images here were taken at Studio9, and they all have keywords applied to them. I showed you some of the thumbnail badges that appear when you apply keywords to images in an earlier section. That's this little tag here on the bottom right of the photos,

It will say that there is a keyword applied to it. If you look at your photos in the GridView, for example, and you look at them quickly, you can see that the keywords have been applied.
I hope this tutorial has helped you work with keyword sets, edit keyword sets, and create new keywords that preset.
Now, remember, you are limited to nine different keywords within the keyword set. But I find that depending on the kind of work you do and the workflow you work with. Nine is enough. You can always add more. In another section, we're going to cover the keyword lists and all of the keywords that you've used in your current catalog.
Keyword List
In this section, we're going to be talking about keyword lists. Keyword lists are the next section that is available to you on the right-hand menu. What I'm going to do is I'm just going to close this keywording section up here so that we have a little bit more visibility for the keyword list.

Let's go ahead and just open it up. This keyword list shows us all of the keywords that we have available in our current Lightroom catalog.

As you can see, some of the misspellings are there, like the backyard. And then if we scroll down a little bit further, we'll see that Zoo with three O's is also there. The numbers beside each of the keywords indicate how many images there are with that particular keyword. So if you have many different keywords, if you have many 10s, maybe even hundreds of keywords, this will be a rather long list.
The invitation here is to work with keywords that make sense for your catalog. The way that I work with Adobe Photoshop Lightroom is I create catalogs based upon the year. Sometimes, I'll make a catalog based on the event, for example, if it's a wedding or a portrait shoot. That way, I can catalog certain types of photos that I'm working with and make it easier to work with those images. Sometimes, of course, the more catalogs you have, the greater chance for error, and maybe even misplacing some photos or even losing some of the data you're working with. There's a little bit of a trade-off here working with multiple catalogs or working with a large keyword list. So it's up to you how you want to use them.
The other thing that I want to point out is that every time you hover over each of these keywords with that number beside it, there's a little white arrow. And once again, if you go and hover over that, it'll tell you that it'll show you the photos containing the keyword as you click. So let's go ahead and click on that. You'll notice right away that it opened up the library filter with the metadata field.

It's changed the filmstrip here to indicate all the three photos that have this canine keyword. And you can see that this canine keyword was shot with three different cameras with three different lenses, and it has no label. So in the next section, we're going to talk about how we can use the library filter and work with other bits of metadata information, including keywords, and how you can work with all of the available images in your Lightroom catalog.
Another thing that you will notice is that there's also a checkmark beside some keywords. And that's for that highlighted image. Now you will notice that this is the image that has been selected.

This image has that indoor keyword, it's got canine, and it's also got a puppy. Now let's say that we wanted to add a few more keywords. It's very easy with the keyword list here. All we have to do is find the appropriate keyword and select it by clicking the checkmark. Now, this is a male puppy, so we'll click male, Kumar takes it, so we'll click Kumar, or whatever other keyword you want to go to. This is yet another way to quickly go through the list of keywords that you have available and add the keywords to the appropriate image.
I hope this has helped you work with the keyword list and quickly add keywords to that existing image by selecting the keyword and clicking on that checkbox to enable it for that image. Also, we learned how we could quickly identify all the photos with the certain keywords by just clicking on the arrow here and changing the view, and changing the library filter on the metadata tab up here. If you have any questions about the keyword list and how to sort and filter with the keywords, please don't hesitate to reach out.
Library Filter - Metadata - Keywords, Camera, Lens, Labels
This section will discuss how to work with all the keywords and filter all the images based upon certain keywords. So, we've already covered the keywording areas and how you can add keywords and work with the presets and the keyword list. Now we're going to work with the library, filter, and filter based on the keywords. Now, if your library filter doesn't show up here, you can select View and show filter bar, and the hotkey for that is the backslash key.

So I'll press the backslash key to get that library filter backup. Sometimes it may appear as none. That means that there are no filters that are being applied to the images there. So let's go ahead and work with the metadata filter. Now, the previous one was the canine, which is what it was showing up here. And you can see that we can filter all 54 keywords here.

We can see which images show up in which keywords here. And of course, if you want to find all the images that don't have keywords, just select the ones that are none. And you will notice that other things will show up as well. All the images with no keywords were taken with 74 different cameras with 49 different lenses. They all have no labels. So you can further narrow your search of images through the use of this metadata library filter. You can filter by keyword by selecting the keyword or by the camera or by the lens or any combination.
Let me show you what I mean. Let's look at this canine. And we'll notice that all of the canine photos were taken with three different cameras.

We want to find all the images we put the keyword canine in, but we want to use the Nikon D 90 camera. So we'll click on that. Oh, well, there's only one photo that does that that has these two filters available.

Let me give you another example of filtering metadata. And this doesn't specifically have to be with keywords. Let's find all the images that don't have keywords. And let's just see what the lenses are and which ones are the more popular lenses. From this library of images, we have the most amount of images with an unknown lens.

Typically, these are point-and-shoot cameras, or they are images that have had their metadata stripped before being published online. But the images that do have a lens profile to it are 18 to 55, which is a common lens. Another lens is also the 24 to 105 as well as the 18 to 55 zoom. These are the standard kit lenses, of course, and you can very easily narrow down the list of images you want to work with. There is no sense in adding a lens profile as part of the keyword because it's already there in the metadata. But keywords are really helpful. For example, let's say if this image here, this image doesn't have a keyword. But you know what we know that this is Stonehenge. So we can very quickly find out what these are and add the keywords to them.

And of course, because that image just had a keyword added, it's no longer part of the nonkeyword. So there's one fewer image with no keywords. And then we can also say that this here, as an example, is Big Ben and parliament.

And those are two keywords that we added there. So I hope this has helped you work with the library filter and sort through keywords sorted through cameras, sorted through lenses, of course, sorted through labels. If you have any questions, please don't hesitate to reach out take care of yourself.
"People" View
In this section, I want to spend a few minutes to talk about Adobe Photoshop Lightroom’s people view, and you can access people view in one of several ways:
- You can select on the people View icon here,

- You can select the View menu and select the people view.

- Alternatively, you can use the keyboard shortcut, which is an O.
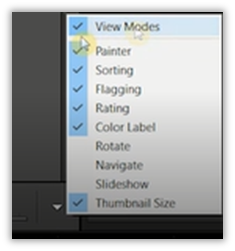
I'm just going to go ahead and select people's view in the toolbar. If this toolbar is not available to you in your Photoshop Lightroom view, you need to enable it by selecting the view modes. I'll show you what that means. For me, it's already selected. If I unclick it, you'll notice that it's disappeared. I'm just going to go back and select it again.
There are no photos in the catalog because I created a new catalog to demonstrate the people view feature.

So I'm just going to go ahead and import some photos into the catalog. And these are the same photos that you can work with. And if you recall, they were in the images folder, and just going to go ahead and import them with minimal previews. We'll wait for Adobe Photoshop Lightroom to go ahead and do that. And once again, we have to enable or disable the address lookup. It'll let us know that it is looking up all of the photo locations of the images. And now that that's done, it just minimizes itself. And these are all of the images that we have available in our catalog. Let's go ahead and open it up. You'll notice that the images folder has been sorted into these folders on the file system.

Let's go ahead and take a look at the portraits because most of our faces will be used with Adobe Photoshop Lightroom people view. Once again, you can select the people view down using the icon. You can use the hotkey O or click on the View menu and select the people view. Let's go ahead and do that. Now in people's view, if you haven't already started, Adobe Photoshop Lightroom. will welcome you to people's view.

There are a couple of ways you can do that. You can only find faces as needed, or you can start finding faces in the entire catalog. In the interest of time, let's work with only find faces as needed. When you select this option, it will work on detecting faces in the currently selected folder, and in this case, we want to work with the portraits folder. So let's go ahead and do that and wait for Adobe Photoshop Lightroom to detect all the faces, and you will see it'll jump up there, and it'll let you know that it is detecting faces in the filmstrip.

This may take a few minutes, depending on how many photos you have in your collection or how many photos you want to work with. I want to point out that there is an option there to turn on face detection. Right now, it is off. And this will work in the background once you enable it. So when this has detected all of the faces, I'll show you what I mean by detecting it in the background. That's great Adobe Photoshop Lightroom has finished processing all the images in the currently selected folder. And you'll notice that there are a couple of sections that show up in the people view, there are named people, and there are unnamed people.
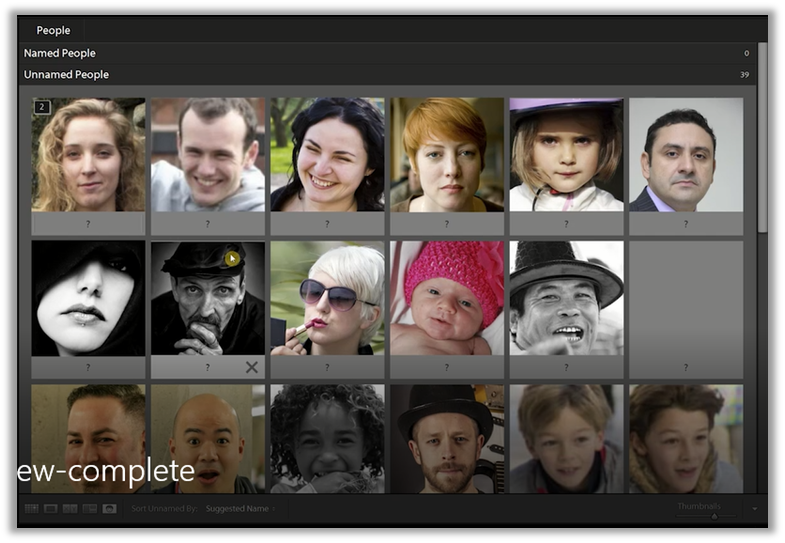
Named people have been given names, and unnamed people are the images that Adobe Photoshop Lightroom doesn't have names for. One other thing that you will notice is that Adobe Photoshop Lightroom stacks photos that it thinks are similar. So let's open it up and see what Adobe Photoshop Lightroom has found. In this case, this is correct because these two images are of the same people.

While Adobe Photoshop Lightroom is great at detecting faces, sometimes it's also not that great at detecting faces. And to illustrate this, I want to go ahead and turn on the automatic background face detection. And let Adobe Photoshop process this in the background. So if I click play, it's going to go ahead and index all of the photos that exist that haven't yet been exist in the existing catalog.

We can see its progress by just clicking the triangle again. You can see that Adobe Photoshop Lightroom is going through all of the images that it hasn't worked within the catalog, and it's slowly indexing them.

And once it's done, we'll return to the tutorial, and I'll show you all the faces that it's detected. Now that Lightroom has finished indexing all of the photos in our catalog. Let's go ahead and select the images folder, the root folder and see what it thinks are people. And you'll notice that it's done a fair good job of finding all of the faces. But here, there's a photo of a puppy that is not a human.

So what we're going to do is we're going to click on X to remove it from the catalog. The more that we train Photoshop Lightroom. To do this, the smarter it gets and the better it can recognize faces. And we noticed that there is another image here, and we're just going to click to remove it from the catalog. And we're going to go through the rest of the catalog and remove all have images that are not people so that we can have an entire catalog dedicated to just the faces of people.
Great, we've removed all of the photos that are not people. And what we are left with are all of the images of people within our Lightroom catalog. Now you'll notice that all of these have question marks here under them. Under the images, these are the names of the people that we're going to have.
Let's call this fellow John. Let's call her Katie. Let's call him Adam. Let's call him Joerg. Let's call him Wilson. And this is just an example of how you can work with all of your images. You'll notice that once you've named the people, they go into the named people section. And they will indicate how many photos of that individual are there. One other thing that I want to point out is that when you click on the individual, you can see that it'll highlight Katie up here, but let's go ahead, and we can double click on Katie or select Katie from the top. You will notice that we've confirmed Katie as these two images. But there are similar images that it found that may be potential candidates for Katie.

In this case, this is Katie, and Adobe Photoshop Lightroom didn't quite recognize Katie because most of the view here, so let's go ahead and say yes, this is Katie it understands who Katie is. The rest of these photos are not Katie, so we're not going to worry about them. And we're just going to go back to all the people. Now that we're back in all the people, you can see more photos of Kati. Let's go back once again to Katie out here, and I want to show you what it means to have Katie or an individual's name. You'll notice that I've selected this photo. If you scroll down on the keyword list, you will notice that Katie shows up as a keyword.

So the idea behind adding names to all the images in people view is to give another unique keyword to all of those images that belong to that person. In this case, this is Katie. The other thing that I want to point out is that based on this keyword list, Adobe Photoshop Lightroom already has cataloged that there are three images of Katie. Or if we want to, we can click on this white arrow. It will show up in the library filter to highlight Katie out here with all the camera lens and label details.

So you can see how by adding a name to an individual, what Adobe Photoshop Lightroom does is make sure that that name becomes an attribute a keyword associated with a certain image. So that very easily you can go to the library filter, you can select the metadata tab, and then you can search by names up here very easily so that you can manage all of the images in your catalog. If you want to reset this keyword filter, you just have to scroll to the top and select all available keywords here.
To quickly recap the learning that we did in this section, we learned about the people view. We can visit the people view at the bottom by selecting the people View icon or using the view menu and people view or the keyboard shortcut O. Once we do that, Adobe Photoshop Lightroom will take us into the people view we have named people. We have unnamed, so you can go ahead and add all of the appropriate names to the people in your catalog. And once you add names to each of those images, those names are keywords populated in the keyword list.
Once again, that becomes a very easy way to search for all of the images based upon the library filter and based upon the metadata using the individual's name that you want to search for. I hope this video has helped you work with the people view in Lightroom and work with the keywords as people's names to more easily manage all the images in your catalog. Once again, if you do have any questions, please don't hesitate to reach out. I am here as a source of support for your continued learning.
"People" View - Adding Names
In this section, I want to spend a few minutes sharing with you how you can work with the people view to more easily add names to all of the individuals who don't yet have names. We've learned that if we wanted to add names to the people, we have to go to the unnamed people who don't have names yet and add names. But what if you wanted to make sure that Adobe Photoshop Lightroom as all of the people it should have? And the reason you want to do that is in an earlier section. We talked about how Adobe Photoshop Lightroom recognizes faces when they're not even faces of people.
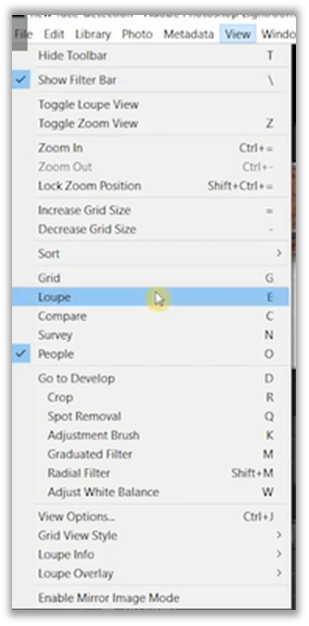
In the same way, sometimes Lightroom won't recognize the actual people due to some of the algorithms they work with or even do the image itself. So how do we do that? Now that we're in people view, what we want to do is go to the loupe view. You can select loupe view at the bottom, use the keyboard shortcut E, or select the loupe view up in this view section. So let's go ahead and do that.
You will notice that the cursor has changed to the crosshairs, and this one has a box around his face. This is an individual that doesn't yet have a name, but we can go ahead and call him Phillip, for example.

If you mistake typing the individual's name, you have to select this icon here and tell Adobe Photoshop Lightroom that this is not Phillip.

If you do that, it'll reset the name, and you can type in a new name, but let's go ahead and keep them as Phillip. Now, as we use the cursor keys to go back and forth through all of the images in the filmstrip, we will find that there are faces that Photoshop Lightroom doesn't recognize. For example, this portrait doesn't have a face because it's close to an eye.

And yet we know it is somebody. Now it's up to you whether you want to include this as part of the face view. And perhaps it might be helpful, but let's call her Ashley. If you go back into the people view, you will have more information and more images about the named people.

All of the names that we add to these people are just metadata or keywords associated with the image, if you recall. Let's go ahead again to the Loupe view and show you what I mean. Sometimes Adobe Photoshop Lightroom is very good. It recognized that this image you see, for example, this was a face.

But if we look at this image here,

This is very clearly an individual, and yet it wasn't recognized by Lightroom. So we can just go ahead and create a face for her. And we'll call her Kimberly. As you spend more and more time entering keywords and entering names, and adding to your Lightroom catalog's metadata, you will have more flexibility when you get to work with your images. For example, working with the library filter and searching on the metadata tags using all the keywords. And this becomes very helpful, especially when you want to manage all your 1000s of photos.
I hope this section has helped you work with the people view in the Loupe view to add faces to images that Adobe Photoshop Lightroom doesn't recognize or even recognizes. You can do that by drawing a box around the face and then by also entering a name. If you do have any questions, please don't hesitate to reach out.
Full Course and Free Book
-

Adobe Photoshop Lightroom Classic
Course5.0 average rating (1 review)Are you a professional an amateur or an aspiring photographer or a digital artist? Impress by creating breathtaking photos with Photoshop Lightroom Classic CC. Learn hands-on techniques from one of the best photo editors there is.
Purchase$1 / month
-

Adobe Photoshop Lightroom Classic Book
CourseAre you a professional an amateur or an aspiring photographer or a digital artist? Impress by creating breathtaking photos with Photoshop Lightroom Classic CC. Learn hands-on techniques from one of the best photo editors there is.
Free