Adobe Lightroom Classic Grid View" And "Loupe View"
About Lightroom Grid View" And "Loupe View"
Product: Adobe Lightroom Classic | Subject: Adobe Photoshop Lightroom Classic
In this exercise, we will learn about Adobe Lightroom Classic Grid View" And "Loupe View" Options
In this section, I want to talk to you a little about grid views and loupe views. I think this is important because it'll give you just a little more information when working with your image catalog. The way that you can access these is to either being the GridView or in the loupe view. So, we can just go ahead and switch back and forth.
When I say views, I mean this information that shows up in the corner of your images in the library. 
In this case, I have a particular set of information up here or this image in the Loupe view. And then I also have a certain bit of information here in the grid view.

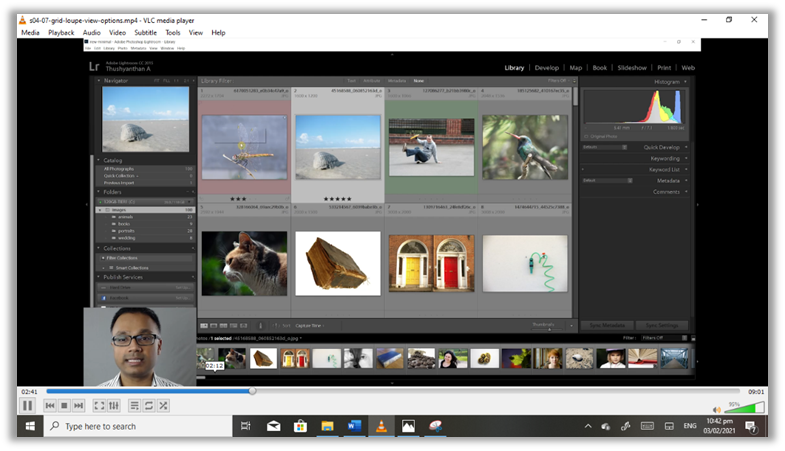
So, how do you change all of that information? So, if I hover over this photo in the grid view, it shows me this information here. And that's good. But what if I want to see all of the information very quickly in the grid? As I see it here, all I have to do is click the J key. And the J key will cycle between certain kinds of views. And you'll notice when I push the J key for the first time. I got this little one that shows me that this is the first image in my current catalog.  If I switched again to portraits, it'd still show me the number one, but it's the first photo in this subfolder. Let me go back again to that. This is photo number one in the image catalog. And all the photos here in this catalog, we get all the way down up to 100.
  So there are 100 images, just like up here, that show up in this view here. So it's very helpful to know what it is that you're working with. Now, if you click J again, it's going to give you a bigger view. And this bigger view shows you the photo number here, number one, and we can see down to 100. Here at the bottom, it also shows you a little bit more information. It shows you the size of the foot. It shows you the filename of the photo up here. It shows you the size of the photo up here, the extension, and a little bit of rating as well.
  So, how does this help? Well, it helps if you use all of these infer bits of information. For example, if you change the rating, it will show you that this is a three-star photo, this is a five-star photo, or is a no-star photo.
  And the other thing that you can do, of course, is to set a color label.
  And let's say we want a red color label. So, this photo is a Red Label. So, it's going to outline itself in red.

Let's make this one a Green Label. You can see that the photo is going to be green there.

Now there are different kinds of views. You see how this image is outlined Green in the background. But this one is outlined in red. If you choose a different photo, we'll see that the photo itself is Red Label. And that's the background of it. This one is in the Green Label. The rest of the photos have no labels or anything like that. So, they're just going to show up in the dark gray.
Now, why would you want to do this? If you use labels and things like that, it becomes very helpful to glance at how these photos are going to show up. The other way, of course, is if you work with many hundreds of images, you can see right off the bait, which ones are the Green Label photos, and which ones are Red Label photos, and all of the stars and all sorts of other metadata that you can quickly see.
Let me zoom back to the appropriate level. If you wanted to cycle through all of the grid view options quickly, all you have to do is click J, and J will cycle through all of the grid view options. Now we made this a Red Label, and we made this a Green Label.

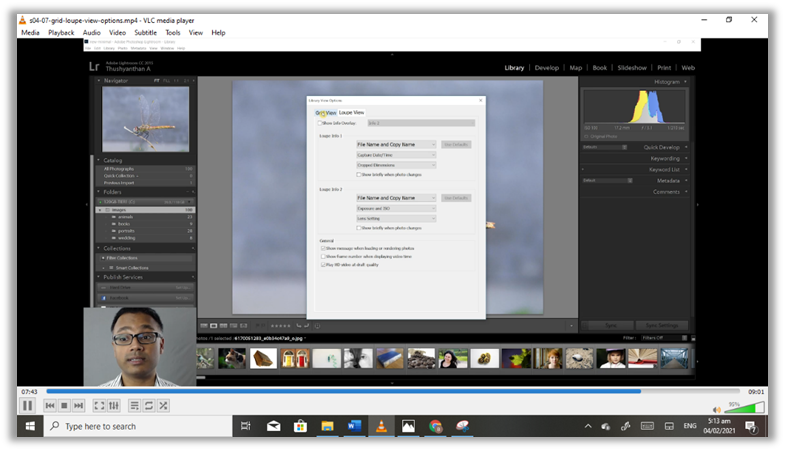
So, of course, that's they're going to be highlighted by clicking j again. You can change all of that. Now, what if you don't want to see this information? Well, you just need to click Ctrl + J. This brings up the grid view options. Now the grid view will show you the extras, whether you want to see compact cells or expanded cells.

Now let me show you the difference between compact cells and expanded cells. Right now, it's highlighted in compact cells. So that means you're going to get the smaller view.

Let's make it a bigger view again. Now you see this is an expanded cell, and it's got bigger views.

So let's go back and use the ctrl + J and show you the grid options. Do you notice that when I change the grid's view to the expanded cell, it automatically changed to the expanded cell?

So let me change it to compact cells again. You can see that it's disappeared. Now with the grid view. With all of these compact cells, we can show a bunch of information. We can have a top label, where we can put the name of the file or several things to add that we want to be part of the puppet label. We can have the index number, or we can not choose it. We can have the rotation icons or the rotation keys so that we can rotate the photo. We can also have a bottom label or not.

And these are all extras that we can choose to show or not. So Lightroom is very flexible this way. And in the expanded cells. We can show the header, of course, with the labels, and we can show the reading footer. So there's a whole bunch of information that we can show. I have the background as a Red Label and a Green Label background in the Compact view back here because I want to show all the labels. Now, this is what I want to remove. Now, if I don't want to show all of those labels, all I have to do is unclick. This tint grid cells with label colors.

Let me just okay that, and you can see that it's doesn't show it anymore. It just shows that label here in the bottom right.

And of course, this is accessible to you by pressing Ctrl + J in the grid view options. Alternatively, you can go to the View menu and then choose the view options, and it'll show you what is available. Depending on how you want to use it, you can add as much information or as little information as you want. I don't like to have any of the label colors. I'm just going to use this to none. And I'm going to change this, of course, to none here as well. Then I'm going to remove the star-related rating. Now that I've reset it to just what is great for me, I'm going to show you what is available to you in the loupe view. So let's go to the loupe view by either clicking the bottom button here or selecting E. Once again, these are also the information that you can choose.

Now there are two kinds of information that you can choose from. It's two different kinds of views that you have for the loupe. This is view number one, and if I can cycle through them by pushing the I key, this is the empty view.

This is the view number one. The first view has the file name. It's got the date that the photo was taken. It's got the image dimensions. Now the second view has, of course, the file name, a bit of information about the shutter speed, the F stop and the ISO, and the zoom level of the lens itself.

And I can press I to cycle through it again. If I wanted to get to the view settings for this loupe just for this information up top, I could click on Ctrl + J just like I did for the grid view. Instead of showing up in the grid view, now I go into the loupe view. Now there are only two bits of information that you can have, louping for one or looping for two.
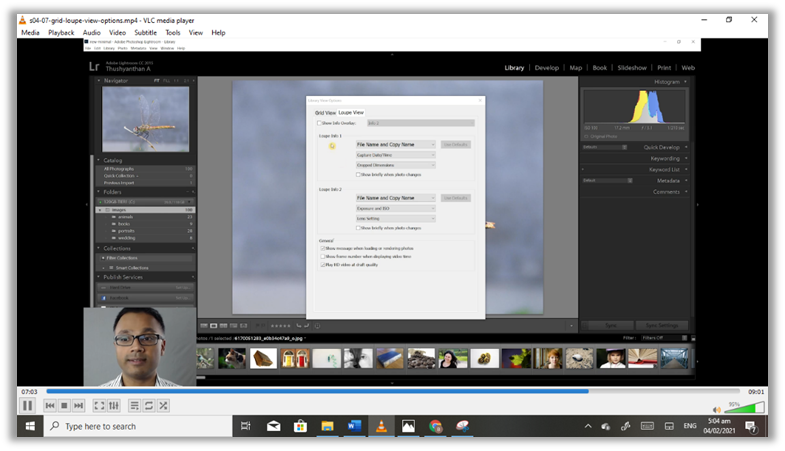
And of course, they're going to have lots of different sections that you can adjust. In this case, loupe information two has filename and copying, exposure and ISO, and Len settings. We could change all of these things if we wanted to. And once again, it's up to you how you want to make use of it. If I want to cycle through the loupe View Settings, I click I, and it's going to go to the first one, the second one, and no view. And if I wanted to get to the View Settings, I can click on Ctrl + J to get to the loupe view settings. Or I can go to the View menu and select View Options. It'll get to the same thing. If I wanted to switch between the GridView settings and the live view settings, I can go ahead and click on these two settings and get to the appropriate views.
Now the way you want to use these views is up to you. Because some information becomes more pertinent to you. Let's say you want to improve your macro photography. In this case, you might want to have this view for the lens settings and the exposure and ISO settings so that you can improve on this and improve on the light. Of course, sometimes you may not even want it because it becomes distracting. So however you use these views is really up to you. But one thing I encourage you to do is go through these View Settings and use them consistently to get more and more information pertinent to you and your photography and your artistic expressions that become more and more relevant to you. I hope this has helped you understand what kind of views you have available to you and how you can change the kind of view settings to work with Adobe Photoshop Lightroom and work with your strengths and Adobe Photoshop Lightroom strengths. So you can get faster, get better, and improve and speed up your workflow.
Full Course and Free Book
-

Adobe Photoshop Lightroom Classic
Course5.0 average rating (1 review)Are you a professional an amateur or an aspiring photographer or a digital artist? Impress by creating breathtaking photos with Photoshop Lightroom Classic CC. Learn hands-on techniques from one of the best photo editors there is.
Purchase$1 / month
-

Adobe Photoshop Lightroom Classic Book
CourseAre you a professional an amateur or an aspiring photographer or a digital artist? Impress by creating breathtaking photos with Photoshop Lightroom Classic CC. Learn hands-on techniques from one of the best photo editors there is.
Free