Adobe Lightroom Classic Red-Eye Correction Tool
About Lightroom Red-Eye Correction Tool
Product: Adobe Lightroom Classic | Subject: Adobe Photoshop Lightroom Classic
In this exercise, we will learn about Adobe Lightroom Classic Red-Eye Correction Tool (For "Pet Eye" Too!).
In this section, I want to share how you can use Adobe Photoshop Lightroom to remove these pesky red eyes from people and pets. Now there are a few images available to you in your images folder that you can use alongside this section. So how do you access this?
- First of all, select your image,
- Then go into the develop module,
- You will notice on the tool strip; the third tool is the red-eye correction tool.
So, let's open it up. You will notice that there are a red-eye selection and pet eye selection.

You will notice that as you select the red-eye selection and move to the image, the cursor becomes a crosshair that you can use to draw a circle on the area you want the red-eye tool to remove. So I want to zoom into the image here to have a better area to work with.

Then I'm going to click in the middle of the eye and drag out a circle that I think is appropriate for the eye. Next, I will let Lightroom take care of the rest. I will repeat the same for the second eye. Now, this looks like she's wearing sunglasses.

That is not what I want. So I will click on the red-eye tool to remove that. Then I will zoom out. You will notice that red eye correction has done a pretty good job.

Now here is another photo that you can work with, this young fellow.

So let me zoom into this image, and you'll notice that there's the red eye right within his pupil.

I am going to select the red-eye tool again. As I hover over this image, what Lightroom does is it remembers the last setting, so I think this is pretty good for the pupil's size. So I'm going to go ahead and click it. Then Lightroom takes care of the rest. Once again, I'm going to go to the second eye. Lightroom takes care of the rest. Now from this image, it looks like it's pretty good. Next, I'm just going to zoom out so that I have a better view. Then, I will turn off the tool to get rid of the circles. You can see that the red eyes are gone.

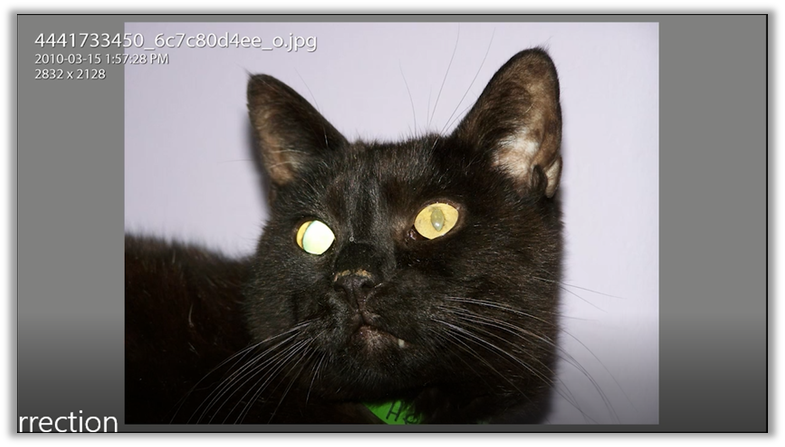
The red-eye tool is great for people, but what about your beloved pets? For pets, when you take photos, they are going to have glowing eyes. They will not have red eyes like humans because they have different biology that works with their eyes. Now some of these photos are going to be hard to adjust. For example, the photo below because it is taken at an angle.
Red eyes and pet eyes happen because of taking photos where the flash is very close to that area that you want to take the image. That is to say; when you are focusing the lens on your subject, the flash is very close to that plane, where you are taking the image, and so it is going to reflect within the eye, and it is going to give this funny look. That is why it is nice to use flash photography to have an external flash source or a flash that's much higher above than that plane that your lens is focusing on.
So let me work with the image below because it's quite easy to remove the pet's eyes. I'm going to zoom into it, and you will notice that this is a rather small image. So this is the best I can do.

Now I am going to select the pet eye tool. Then I'm going to choose the pet eye.

Once again, just like with the red-eye correction, I will find the middle of the eye. Then I will draw around it so that it does a good job of removing the glowing eyes. I'm going to repeat the same for the second eye, and so far, it is okay, So let me turn off the red-eye tool to see what it looks like. It's all right, mind you, this photo's quality and the resolution were quite low, so there's not much you can work with.

Now, let me give you another example.

Once again, I chose that photo from the filmstrip. I'm going to go into the red-eye correction Tool and choose pe eye. Then I'm going to go into the middle of the eye, and I will draw out a section. I'm going to repeat the same on the second eye. Next, I will turn off the tool to give you an idea of what it looks like. In this case, it is not that good.

Honestly, I can't do much more than that.
The invitation, of course, is to remember that when you take photos of pets or even of people, you should ensure that the flash is away from the camera or above that line that the lens is looking through. That way, you can reduce the chances of red eye ever occurring.
So I hope this tutorial has helped you use the red-eye correction tool, which you can find on the tool strip below the histogram in the develop module. If you do have any questions, please don't hesitate to reach out.
Full Course and Free Book
-

Adobe Photoshop Lightroom Classic
Course5.0 average rating (1 review)Are you a professional an amateur or an aspiring photographer or a digital artist? Impress by creating breathtaking photos with Photoshop Lightroom Classic CC. Learn hands-on techniques from one of the best photo editors there is.
Purchase$1 / month
-

Adobe Photoshop Lightroom Classic Book
CourseAre you a professional an amateur or an aspiring photographer or a digital artist? Impress by creating breathtaking photos with Photoshop Lightroom Classic CC. Learn hands-on techniques from one of the best photo editors there is.
Free