Adobe Lightroom Classic "Slideshow" Module.
About Lightroom "Slideshow" Module.
Product: Adobe Lightroom Classic | Subject: Adobe Photoshop Lightroom Classic
In this exercise, we will learn about Adobe Lightroom Classic and the "Slideshow" Module.
In this section, I want to share how you can use Adobe Photoshop Lightroom to create and export a slideshow for all of your images that you have worked on. For this example, I have created a slideshow collection that you can see down here, and it's got 46 images.
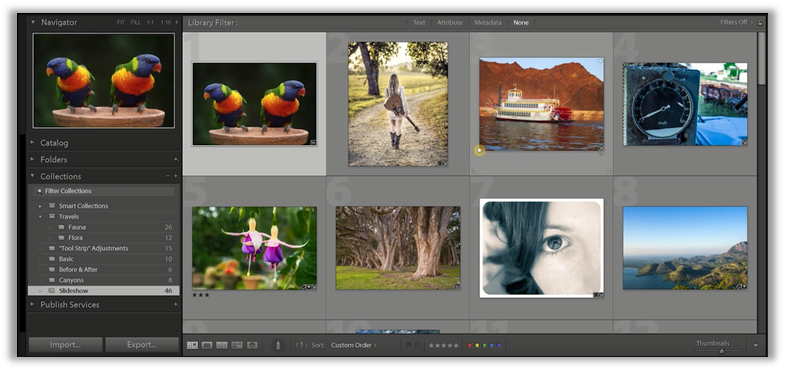
Most of these images are images that we worked on as examples within the course so that you can see what they look like as a slideshow. To go into the slideshow module, we'll need to go up and click on the slideshow module. I want to point out a couple of panels to you: the left-hand and right-hand sides. If you recall, the left-hand side is general to the modules. On the other hand, the right-hand side is very specific to the modules. Let us bring our attention to the left-hand side. You will notice that there are three sections preview, template browser, and collections.

If you recall, collections travel with you throughout all of the modules. These are just the collections we have added and created within our catalog if you open it up.

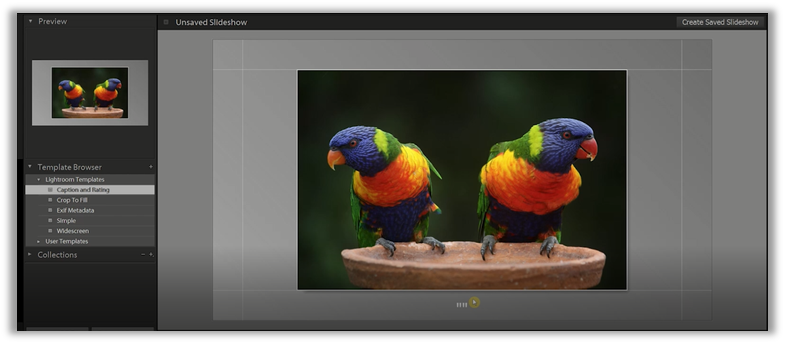
So I'm just going to close the collections up. Now let's open up both the preview and the template browser.

Now the preview window used to be called the navigator window in the library and develop module. But in the export module, it is going to be called the preview window. In this preview window, you will see what the slideshow will look like based upon the template you apply to it. Within the template browser, you will notice a folder called Lightroom templates, and there is another folder called user templates. The user templates are the templates that you create as you work with the slideshow module. For now, we do not have anything in the user template. So we are just going to work with the default Lightroom templates. You will notice that as you hover over every single template, the preview window will change to show you what that image will look like within the template you're going to apply to it.
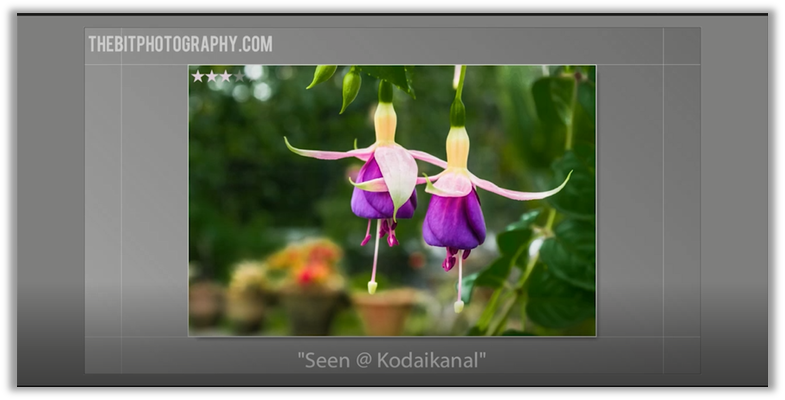
Now there are various templates that you can use, such as caption and rating. If I choose that, you will notice that there is a caption down here.
This is the caption that we add as part of the metadata to the image. There's another one called crop to fill, and it will fill the entire width of your viewing area.

There's also Exif metadata, which has a little bit of metadata information.

It has the identity plate up, the date that the image was taken, exposure settings, and more information at the bottom. The simple template has an identity plate on the top left, it is very, very small, and most of the slideshow is given over to the images.

Then widescreen is just for a wider screen view of the image.

For this section, let's apply the caption and rating template because it will give you a better idea of the kinds of options you can use. Now I would like to direct your attention to the right-hand panel. Once again, if you recall, all of these sections in the right panel are pertinent and applicable only to the slideshow module's options.

Let's open it up. You will notice that within the options, there is a section called zoom to full-frame. If you select it, it's going to zoom to fill the frame.

Now the frame is not the entire window that you see. But the area is constrained by the guides, which are within the layout section. I will get to that later. The other options that you can add are the stroke border. And that's to the image itself. And you'll notice that there's a thin, light gray border around the image, and there's, of course, a cast shadow. Then you can adjust the opacity, the offset, and things like that. So go ahead and play with these as you need to. Zoom to fill frame option is best for widescreen or landscape-type photos. It doesn't work well with portrait photos. I will show you as an example; let me pick the image below.

You will notice that this image has “zoom to fill the frame.” But if I unclick it, you will notice the entire image.

So with portrait-oriented photos, you might want to ensure that your zoom to fill the frame is disabled so that you don't get kind of a weird, wonky look through your slideshow. So I'm just going to disable that for now and close the options up. Within the Layout option, there are a couple of subsections here.

The first one is to show the guides, and the second is for aspect preview. The aspect preview area has three different options that you can work with, the screen, which is the current resolution of the screen 16:9 which is 1480P or 1440P or even 4k. Then, of course, the 4:3 which is for older monitors that have the square ratio.
Let's click and select to work with the screen. So this is just the screen resolution that your computer monitors display. These guides are the guides to the top, the bottom, the left, and right of the image. The guides are the areas within which the image will be displayed. Now you will notice that you can have sliders that adjust where the guides go. Then there is also just a checkbox to link all of the sliders. If I adjust any one of these sliders and the link all has been selected, you will notice that all of the values the borders will adjust in the same way. You will notice that the image gets bigger because the border is very, very minimal.

Now I'm just going to undo that and leave it as it was. Let me just close this up and open up the overlays.
Now the overlays are just a few areas of importance. Within this template, there is no area for the identity plate, so we can choose to enable it. If you do, it will show up in the top left corner.

Now there are different identity plates that you can create. Now I will show you how. There is a drop-down box where you can have the main identity plate or edit it and create a new one.

I have created one for my website, THEBITPHOTOGRAPHY.COM. And, of course, you can choose to override the color of this overlay. You can enable the override and then choose the appropriate color that you want. You can work within the sliders, choose a color, and you'll notice that the overlay changes.

I'm just going to exit and choose not to override the color and keep it as it was. You will also notice that there are a few sections for opacity, scale, and whether or not you want to add a watermark. Other options within the overlays are for rating stars and text overlays. The text overlays are, in this case, going to be the caption, and the rating stars are going to be the rating of the image. Now I do have one image which has a three-star rating, and it also has a caption.
So these are what the overlays are going to look like. And of course, you can always adjust the colors of these overlays to work with your slideshow. I'm just going to leave it as it is. And I'm going to close this overlay section.
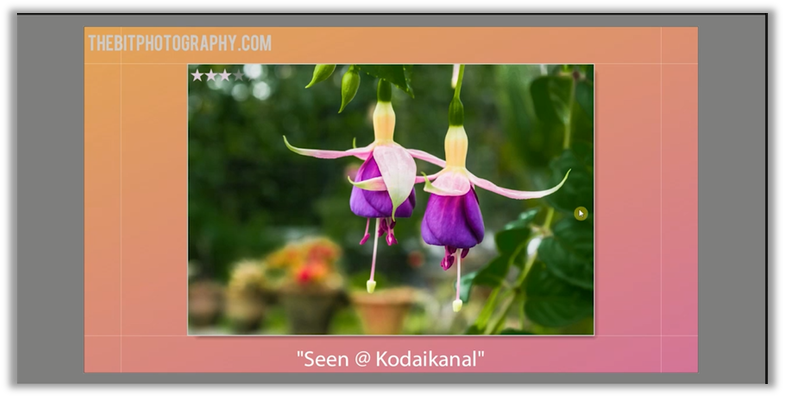
Then there is also the backdrop. Within the backdrop, there are three subsections. The first one is a color wash. The second one is a background image, and the third one is the background color.

The color wash appears as a gradient from the bottom left to the top right. I will show you what that means. Let me change the color. I will create a nice color to very easily see what it is.

we will notice at the bottom left, it's a little bit lighter, and then the gradient is applied and becomes a little bit darker at the top. Of course, you can adjust the carwash's opacity and make it blend in or do whatever else you'd like to do, or adjust the angle of the gradient and how it's applied and work with it however you want it.
With the background image option, you can drag any one of the photos in your filmstrip as the background, and you will notice that the image you drag becomes the background or the entire slideshow.

So this gives you a good idea of what it is that you are going to be seeing on your screen. As you work with the slideshow, your screen is the entire big border area. And within the guides, this is going to be where your images are presented.
The text overlays are at the bottom, the rating stars are on top of the image, and then your identity plate is up. If you want to, you can adjust the background image's opacity to blend it out so that the focus is actually on the image itself. Let me go ahead and uncheck that.
The other thing that you can apply is a background color. Now the background color is different from the color wash because the gradient is not applied to the background color. I will show you what I mean. Let me adjust it to some color that is different from the color that we have within the carwash. We have the background on the top left, and on the bottom left, we have the color wash. And as they mix, they create this interesting color.
Now, you are welcome to play with all of these settings as much as you want. But I'm going to disable them for now and leave them as plain black. Let me close the backdrop up and open up the titles.
Within the title section, you can create an introduction screen, and this introduction screen will be the first thing that people will see when they watch your slideshow. Let me show that to you again.

You will notice that the intro screen was an identity plate. If I wanted to, I could always adjust the identity plate or even create a new one for the intro screen. Along with the intro screen, you can also have an ending screen. This is the screen that will be shown at the end of your slideshow. As with all of these sections, each of these areas is optional. So whichever areas you want to work with, you are welcome to check them off and make adjustments to work with your slideshow.
In the music section, you will notice that it has this toggle switch.

For certain templates, some templates will have the music disabled, and you cannot add it. This toggle is turned off in this template, so I can't add any music until I turn on the toggle. You will notice that there is a new plus sign that appears. Let me go ahead and add a music file and show you what it looks like. It's going to open it up into my music folder. Since I have got a few tracks, I can select them. The supported files are mp3, m4a, and m4b. These are the only kinds of files that you can add as music files. I have a selection of mp3 files that I'm going to choose. I'm going to add to them. After that, it will tell me that the music's duration is two minutes and 38 seconds because that's how long the track is.

I can go ahead and add up to 10 different tracks. It will just keep adding to them, and the tracks will play sequentially based on the sequence. If you want to readjust which of the tracks play first or last, you can always click on the track and readjust it to where you want it to show up on the playlist.
The playback option has a slideshow mode which you can change from automatic to manual.

The next subsection is for whether you want to sync the slides to the music and adjust the slide length and the crossfades between the images, or you can always fit it to music. Now, since we don't have any music applying, these are not going to show up. The next subsection, which is grayed since we don't have any music, is whether we want to emphasize the video itself or the music. So it will make the music louder or less loud.
Then one other option is the pan and zoom. If you enable it, it will have a movement to the image. It will slowly give the viewer that visual interest, especially when the slideshow is exported into a video format. So I kind of like Pan and Zoom. But I'd like to make sure that my pan and zoom are kind of on the low end, giving a little more nuance and flavor to the slideshow. I'm going to go ahead and turn it off. You can choose to repeat the slideshow and have a random order. Now, if you don't have the random order, the images will be played from the first slide, second slide, and third slide to the end.
Then, of course, it is going to repeat as you have chosen it. Finally, the last option on this playback is the quality of the preview. The quality goes from draft mode, standard mode, to high quality. I find, in most cases, the standard is pretty good. You are welcome to try draft or high depending on how you want to work with your slideshow. I am just going to click play and show you what the slideshow looks like. Keep in mind Lightroom prepares the slideshow. It is going to start from this currently selected slide is just going to go ahead with that. You'll notice that the slide duration is four seconds, the crossfades last about two and a half seconds. And these were the options that we gave to the slideshow, so I'm just going to escape out of it. And that's it for this slideshow module, to introduce the left-hand panel and the right-hand panel to you.
Then finally, one more thing is you now have two different options here.

You can export the slideshow as a PDF or video. And this is where adding music to the slideshow becomes important because once you add music, you probably want to export it as a video and share it online or share it with family or with your client.
I hope this section has helped you explore the slideshow module in depth to understand what the options mean and how you can work and adjust those options to create the slideshow that makes sense for you for your client and, of course, for your family.
Full Course and Free Book
-

Adobe Photoshop Lightroom Classic
Course5.0 average rating (1 review)Are you a professional an amateur or an aspiring photographer or a digital artist? Impress by creating breathtaking photos with Photoshop Lightroom Classic CC. Learn hands-on techniques from one of the best photo editors there is.
Purchase$1 / month
-

Adobe Photoshop Lightroom Classic Book
CourseAre you a professional an amateur or an aspiring photographer or a digital artist? Impress by creating breathtaking photos with Photoshop Lightroom Classic CC. Learn hands-on techniques from one of the best photo editors there is.
Free